1703 lines
54 KiB
Markdown
1703 lines
54 KiB
Markdown
# 微服务
|
||
|
||
## 踩坑总结
|
||
|
||
### Mybatis-PLUS
|
||
|
||
分页不生效,因为mybatis-plus自3.5.9起,默认不包含分页插件,需要自己引入。
|
||
|
||
```xml
|
||
<dependencyManagement>
|
||
<dependencies>
|
||
<dependency>
|
||
<groupId>com.baomidou</groupId>
|
||
<artifactId>mybatis-plus-bom</artifactId>
|
||
<version>3.5.9</version>
|
||
<type>pom</type>
|
||
<scope>import</scope>
|
||
</dependency>
|
||
</dependencies>
|
||
</dependencyManagement>
|
||
```
|
||
|
||
```xml
|
||
<!-- MyBatis Plus 分页插件 -->
|
||
<dependency>
|
||
<groupId>com.baomidou</groupId>
|
||
<artifactId>mybatis-plus-jsqlparser-4.9</artifactId>
|
||
</dependency>
|
||
```
|
||
|
||
config包下新建:
|
||
|
||
```java
|
||
@Configuration
|
||
@MapperScan("edu.whut.smilepicturebackend.mapper")
|
||
public class MybatisPlusConfig {
|
||
|
||
/**
|
||
* 拦截器配置
|
||
*
|
||
* @return {@link MybatisPlusInterceptor}
|
||
*/
|
||
@Bean
|
||
public MybatisPlusInterceptor mybatisPlusInterceptor() {
|
||
MybatisPlusInterceptor interceptor = new MybatisPlusInterceptor();
|
||
// 分页插件
|
||
interceptor.addInnerInterceptor(new PaginationInnerInterceptor(DbType.MYSQL));
|
||
return interceptor;
|
||
}
|
||
}
|
||
```
|
||
|
||
|
||
|
||
### 雪花算法表示精度问题
|
||
|
||
“雪花算法”(Snowflake)生成的 ID 本质上是一个 64 位的整数(Java等后端里通常对应 `long` ),而浏览器端的 JavaScript `Number` 类型只能安全地表示到 2^53−1 以内的整数,超出这个范围就会出现 “精度丢失”──即低位那几位数字可能会被四舍五入掉,导致 ID 读取或比对出错。因此,最佳实践是:
|
||
|
||
1. **后端依然用 `long`(或等价的 64 位整数)存储和处理雪花 ID。**
|
||
2. **对外接口(REST/graphQL 等)返回时,将这类超出 JS 安全范围的整数序列化为字符串**,比如:
|
||
|
||
```java
|
||
@Configuration
|
||
public class JacksonConfig {
|
||
|
||
private static final String DATE_FORMAT = "yyyy-MM-dd";
|
||
private static final String DATETIME_FORMAT = "yyyy-MM-dd HH:mm:ss";
|
||
private static final String TIME_FORMAT = "HH:mm:ss";
|
||
|
||
@Bean
|
||
public Jackson2ObjectMapperBuilderCustomizer jacksonCustomizer() {
|
||
return builder -> {
|
||
// 将所有 long / Long 类型序列化成 String
|
||
SimpleModule longToString = new SimpleModule();
|
||
longToString.addSerializer(Long.class, ToStringSerializer.instance);
|
||
longToString.addSerializer(Long.TYPE, ToStringSerializer.instance);
|
||
builder.modules(longToString);
|
||
};
|
||
}
|
||
}
|
||
```
|
||
|
||
|
||
|
||
### 包扫描问题(非常容易出错!)
|
||
|
||
以 Spring Boot 为例,框架默认会扫描启动类所在包及其子包中的组件(`@Component`/`@Service`/`@Repository`/`@Configuration` 等),将它们注册到 Spring 容器中。
|
||
|
||
**问题**:当你把某些业务组件、配置类或第三方模块放在了启动类的同级或平级包下(而非子包),却没有手动指定扫描路径,就会出现 “无法注入 Bean” 的情况。
|
||
|
||
```java
|
||
// 启动类
|
||
@SpringBootApplication
|
||
public class OrderServiceApplication { … }
|
||
|
||
// 业务类位于 com.example.common 包
|
||
@Service
|
||
public class PaymentClient { … }
|
||
|
||
```
|
||
|
||
如果项目结构是:
|
||
|
||
```text
|
||
com.example.orderservice ← 启动类
|
||
com.example.common ← 依赖组件
|
||
|
||
```
|
||
|
||
默认情况下 `com.example.common` 不会被扫描到,导致注入 `PaymentClient` 时抛出 `NoSuchBeanDefinitionException`。
|
||
|
||
|
||
|
||
解决方案:
|
||
|
||
1)显式指定扫描路径**:
|
||
|
||
```java
|
||
@SpringBootApplication
|
||
@ComponentScan(basePackages = {
|
||
"com.example.orderservice",
|
||
"com.example.common"
|
||
})
|
||
public class OrderServiceApplication { … }
|
||
|
||
```
|
||
|
||
2)**使用 `@Import` 或者 Spring Cloud 的自动配置机制**(如编写 `spring.factories`,让依赖模块自动装配)。
|
||
|
||
|
||
|
||
### 数据库连接池
|
||
|
||
**为什么需要?**
|
||
|
||
每次通过 JDBC 调用 `DriverManager.getConnection(...)`,都要完成网络握手、权限验证、初始化会话等大量开销,通常耗时在几十到几百毫秒不等。连接池通过**提前建立好 N 条物理连接**并在应用各处循环复用,避免了反复的开销。
|
||
|
||
**流程**
|
||
|
||
数据库连接池在应用启动时**预先创建**一定数量的物理连接,并将它们保存在空闲队列中;当业务需要访问数据库时,直接**从池中“借用”一个连接**(无需新建),**用完后调用 `close()` 即把它归还**池中;池会根据空闲超时或最大寿命策略自动回收旧连接,并在借出或定期扫描时执行简单心跳(如 `SELECT 1`)来剔除失效连接,确保始终有可用、健康的连接供高并发场景下快速复用。
|
||
|
||
```scss
|
||
┌─────────────────────────────────────────┐
|
||
│ 应用线程 A 调用 getConnection() │
|
||
│ ┌──────────┐ ┌─────────────┐ │
|
||
│ │ 空闲连接队列 │──取出──▶│ 物理连接 │───┐│
|
||
│ └──────────┘ └─────────────┘ ││
|
||
│ (代理包装) ││
|
||
│ 返回代理连接给业务代码 ││
|
||
└─────────────────────────────────────────┘ │
|
||
│
|
||
┌─────────────────────────────────────────┐ │
|
||
│ 业务执行 SQL,最后调用 close() │
|
||
│ ┌───────────────┐ ┌────────────┐ │
|
||
│ │ 代理 Connection │──归还──▶│ 空闲连接队列 │◀─────┘
|
||
│ └───────────────┘ └────────────┘
|
||
└─────────────────────────────────────────┘
|
||
|
||
```
|
||
|
||
当你从连接池里拿到一个底层已被远程关闭的连接时,HikariCP(以及大多数成熟连接池)会在“借出”前先做一次简易校验(默认为 `Connection.isValid()`,或你配置的 `connection-test-query`)。如果校验失败,连接池会自动将这条“死”连接销毁,**并尝试从池里或新建一个新的物理连接来替换**,再把新的健康连接返给业务;只有当新的连接也创建或校验失败到达池的最大重试次数时,才会抛出拿不到连接的超时异常。
|
||
|
||
|
||
|
||
**遇到的问题**
|
||
|
||
如果本地启动了 Java 应用和前端 Nginx,而 MySQL 部署在远程服务器上,Java 应用通过连接池与远程数据库建立的 TCP 连接在 5 分钟内若无任何 SQL 操作,就会因中间网络设备(如 NAT、负载均衡器、防火墙)超时断开,且应用层不会主动感知,导致后续 SQL 请求失败。
|
||
|
||
```shell
|
||
13:20:01:383 WARN 43640 --- [nio-8084-exec-4] com.zaxxer.hikari.pool.PoolBase : HikariPool-1 - Failed to validate connection com.mysql.cj.jdbc.ConnectionImpl@36e971ae (No operations allowed after connection closed.). Possibly consider using a shorter maxLifetime value.
|
||
13:20:01:384 ERROR 43640 --- [nio-8084-exec-4] o.a.c.c.C.[.[.[/].[dispatcherServlet] : Servlet.service() for servlet [dispatcherServlet] in context with path [] threw exception [Request processing failed; nested exception is org.mybatis.spring.MyBatisSystemException: nested exception is org.apache.ibatis.exceptions.PersistenceException:
|
||
### Error querying database. Cause: org.springframework.jdbc.CannotGetJdbcConnectionException: Failed to obtain JDBC Connection; nested exception is java.sql.SQLTransientConnectionException: HikariPool-1 - Connection is not available, request timed out after 30048ms.
|
||
```
|
||
|
||
为了解决这个问题,
|
||
|
||
1.只需在 Spring Boot 配置中为 HikariCP 添加定期心跳,让连接池在真正断连前保持流量:
|
||
|
||
```
|
||
spring:
|
||
datasource:
|
||
hikari:
|
||
keepalive-time: 180000 # 3 分钟发送一次心跳(维持 TCP 活跃)
|
||
```
|
||
|
||
这样,HikariCP 会每隔 3 分钟自动对空闲连接执行轻量级的验证操作(如 `Connection.isValid()`),确保中间网络链路不会因长时间静默而被强制关闭。
|
||
|
||
|
||
|
||
2.如果JAVA应用和Mysql在同一服务器上(可互通),就不会有上述问题!
|
||
|
||
|
||
|
||
### Sentinel无数据
|
||
|
||
<img src="https://pic.bitday.top/i/2025/05/25/uaviaj-0.png" alt="image-20250525183228831" style="zoom:67%;" />
|
||
|
||
sentinel 控制台可以发现哪些微服务连接了,但是Dashboard 在尝试去拿各个微服务上报的规则(端点 `/getRules`)和指标(端点 `/metric`)时,一直连不上它们,因为JAVA微服务是在本地私网内部署的,Dashboard无法连接上。
|
||
|
||
```shell
|
||
Failed to fetch metric from http://192.168.0.107:8725/metric?…
|
||
Failed to fetch metric from http://192.168.0.107:8721/metric?…
|
||
HTTP request failed: http://192.168.0.107:8721/getRules?type=flow
|
||
java.net.ConnectException: Operation timed out
|
||
```
|
||
|
||
解决办法:
|
||
|
||
1.将JAVA应用部署到服务器,但我的服务器内存不够
|
||
|
||
2.将Dashboard部署到本机docker中,和JAVA应用可互通。
|
||
|
||
|
||
|
||
### Nacos迁移后的 No DataSource set
|
||
|
||
原本Nacos和Mysql都是部署到公网服务器,mysql容器对外暴露3307,因此Nacos的env文件中可以是:
|
||
|
||
```env
|
||
MYSQL_SERVICE_DB_NAME=124.xxx.xxx.xxx
|
||
MYSQL_SERVICE_PORT=3307
|
||
```
|
||
|
||
填的mysql的公网ip,以及它暴露的端口3307,这是OK的
|
||
|
||
|
||
|
||
**但是**如果将它们部署在docker同一网络中,应该这样写:
|
||
|
||
```
|
||
MYSQL_SERVICE_DB_NAME=mysql
|
||
MYSQL_SERVICE_PORT=3306
|
||
```
|
||
|
||
mysql是服务名,不能写localhost(或 `127.0.0.1`),它永远只会指向「当前容器自己」!!!
|
||
|
||
|
||
|
||
注意,Nacos中的配置文件**也要迁移过来**,导入nacos配置列表中,并且修改JAVA项目中nacos的地址
|
||
|
||
<img src="https://pic.bitday.top/i/2025/05/24/s9s6am-0.png" alt="image-20250524170952380" style="zoom:67%;" />
|
||
|
||
|
||
|
||
### Docker Compose问题
|
||
|
||
1)如果你把某个服务从 `docker-compose.yml` 里删掉,然后再执行:
|
||
|
||
```shell
|
||
docker compose down
|
||
```
|
||
|
||
默认情况下 **并不会** 停止或删除那个已经“离开”了 Compose 配置的容器。
|
||
|
||
只能:
|
||
|
||
```shell
|
||
docker compose down --remove-orphans #清理这些“孤儿”容器
|
||
```
|
||
|
||
或者手动清理:
|
||
|
||
```shell
|
||
docker ps #列出容器
|
||
docker stop <container_id_or_name>
|
||
docker rm <container_id_or_name>
|
||
```
|
||
|
||
|
||
|
||
2)端口占用问题
|
||
|
||
Error response from daemon: Ports are not available: exposing port TCP 0.0.0.0:5672 -> 0.0.0.0:0: listen tcp 0.0.0.0:5672: bind: An attempt was made to access a socket in a way forbidden by its access permissions.
|
||
|
||
先查看是否端口被占用:
|
||
|
||
```shell
|
||
netstat -aon | findstr 5672
|
||
```
|
||
|
||
如果没有被占用,那么就是windows的bug,在CMD使用管理员权限重启NAT网络服务即可
|
||
|
||
```shell
|
||
net stop winnat
|
||
net start winnat
|
||
```
|
||
|
||
|
||
|
||
3)ip地址问题
|
||
|
||
```yml
|
||
seata-server:
|
||
image: seataio/seata-server:1.5.2
|
||
container_name: seata-server
|
||
restart: unless-stopped
|
||
depends_on:
|
||
- mysql
|
||
- nacos
|
||
environment:
|
||
# 指定 Seata 注册中心和配置中心地址
|
||
- SEATA_IP=192.168.10.218 # IDEA 可以访问到的宿主机 IP
|
||
- SEATA_SERVICE_PORT=17099
|
||
- SEATA_CONFIG_TYPE=file
|
||
# 可视情况再加:SEATA_NACOS_SERVER_ADDR=nacos:8848
|
||
networks:
|
||
- hmall-net
|
||
ports:
|
||
- "17099:7099" # TC 服务端口
|
||
- "8099:8099" # 服务管理端口(Console)
|
||
volumes:
|
||
- ./seata:/seata-server/resources
|
||
```
|
||
|
||
SEATA_IP配置的是宿主机IP,你的电脑换了IP,如从教室到寝室,那这里的IP也要跟着变:ipconfig查看宿主机ip
|
||
|
||
|
||
|
||
## 认识微服务
|
||
|
||
微服务架构,首先是服务化,就是将单体架构中的功能模块从单体应用中拆分出来,独立部署为多个服务。
|
||
|
||
<img src="https://pic.bitday.top/i/2025/05/20/iyyuzk-0.png" alt="image-20250520114708790" style="zoom:67%;" />
|
||
|
||
**SpringCloud**
|
||
|
||

|
||
|
||
使用Spring Cloud 2021.0.x以及Spring Boot 2.7.x版本(需要对应)。
|
||
|
||
<img src="https://pic.bitday.top/i/2025/05/20/knttz4-0.png" alt="image-20250520124938379" style="zoom:80%;" />
|
||
|
||
<img src="https://pic.bitday.top/i/2025/05/20/knvz3s-0.png" alt="image-20250520124948604" style="zoom:80%;" />
|
||
|
||
在父pom中的`<dependencyManagement>`锁定版本,使得后续你在子模块里引用 Spring Cloud 或 Spring Cloud Alibaba 的各个组件时,不需要再写 `<version>`,Maven 会统一采用你在父 POM 中指定的版本。
|
||
|
||
|
||
|
||
## 微服务拆分
|
||
|
||
微服务拆分时:
|
||
|
||
- **高内聚**:每个微服务的职责要尽量单一,包含的业务相互关联度高、完整度高。
|
||
- **低耦合**:每个微服务的功能要相对独立,尽量减少对其它微服务的依赖,或者依赖接口的稳定性要强。
|
||
|
||
<img src="https://pic.bitday.top/i/2025/05/20/m06nzx-0.png" alt="image-20250520133100419" style="zoom:67%;" />
|
||
|
||
**一般微服务项目有两种不同的工程结构:**
|
||
|
||
- [ ] 完全解耦:每一个微服务都创建为一个**独立的工程**,甚至可以使用不同的开发语言来开发,项目完全解耦。
|
||
- 优点:服务之间耦合度低
|
||
- 缺点:每个项目都有自己的独立仓库,管理起来比较麻烦
|
||
- [x] **Maven聚合**:整个项目为一个Project,然后每个微服务是其中的**一个Module**
|
||
- 优点:项目代码集中,管理和运维方便
|
||
- 缺点:服务之间耦合,编译时间较长
|
||
|
||
,每个模块都要有:pom.xml application.yml controller service mapper pojo 启动类
|
||
|
||
|
||
|
||
IDEA配置小技巧:
|
||
|
||
1.自动导包
|
||
|
||
|
||
|
||
2.配置service窗口,以显示多个微服务启动类
|
||
|
||
<img src="https://pic.bitday.top/i/2025/05/21/pf7h7n-0.png" alt="image-20250521153717289" style="zoom: 80%;" />
|
||
|
||
3.如何在idea中虚拟多服务负载均衡?
|
||
|
||
<img src="https://pic.bitday.top/i/2025/05/21/tzm5xp-0.png" alt="image-20250521181337779" style="zoom:80%;" />
|
||
|
||
<img src="https://pic.bitday.top/i/2025/05/21/u0vvwe-0.png" alt="image-20250521181552335" style="zoom:80%;" />
|
||
|
||
More options->Add VM options -> **-Dserver.port=xxxx**
|
||
|
||
这边设置不同的端口号!
|
||
|
||
|
||
|
||
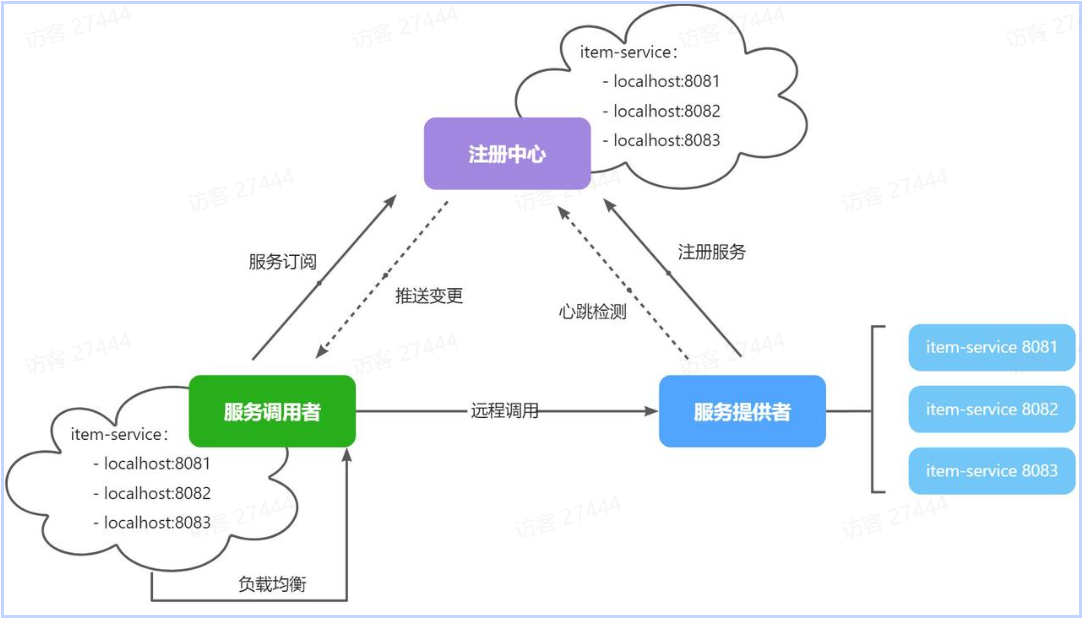
## 服务注册和发现
|
||
|
||
注册中心、服务提供者、服务消费者三者间关系如下:
|
||
|
||
|
||
|
||
流程如下:
|
||
|
||
- 服务启动时就会**注册自己的服务信息**(服务名、IP、端口)到注册中心
|
||
- 调用者可以从注册中心订阅想要的服务,获取服务对应的实例列表(1个服务可能多实例部署)
|
||
- 调用者自己对实例列表**负载均衡,挑选一个实例**
|
||
- 调用者向该实例发起远程调用
|
||
|
||
当服务提供者的实例宕机或者启动新实例时,调用者如何得知呢?
|
||
|
||
- 服务提供者会**定期**向注册中心发送请求,报告自己的健康状态(**心跳请求**)
|
||
- 当注册中心长时间收不到提供者的心跳时,会认为该实例宕机,将其**从服务的实例列表中剔除**
|
||
- 当服务有新实例启动时,会发送注册服务请求,其信息会被记录在注册中心的服务实例列表
|
||
- 当注册中心服务列表变更时,会**主动通知微服务**,更新本地服务列表(防止服务调用者继续调用挂逼的服务)
|
||
|
||
### Nacos部署:
|
||
|
||
1.依赖mysql中的一个数据库 ,可由nacos.sql初始化
|
||
|
||
2.需要.env文件,配置和数据库的连接信息:
|
||
|
||
```text
|
||
PREFER_HOST_MODE=hostname
|
||
MODE=standalone
|
||
SPRING_DATASOURCE_PLATFORM=mysql
|
||
MYSQL_SERVICE_HOST=124.71.159.***
|
||
MYSQL_SERVICE_DB_NAME=nacos
|
||
MYSQL_SERVICE_PORT=3307
|
||
MYSQL_SERVICE_USER=root
|
||
MYSQL_SERVICE_PASSWORD=*******
|
||
MYSQL_SERVICE_DB_PARAM=characterEncoding=utf8&connectTimeout=1000&socketTimeout=3000&autoReconnect=true&useSSL=false&allowPublicKeyRetrieval=true&serverTimezone=Asia/Shanghai
|
||
```
|
||
|
||
3.docker部署:
|
||
|
||
```yml
|
||
nacos:
|
||
image: nacos/nacos-server:v2.1.0
|
||
container_name: nacos-server
|
||
restart: unless-stopped
|
||
env_file:
|
||
- ./nacos/custom.env # 自定义环境变量文件
|
||
ports:
|
||
- "8848:8848" # Nacos 控制台端口
|
||
- "9848:9848" # RPC 通信端口 (TCP 长连接/心跳)
|
||
- "9849:9849" # gRPC 通信端口
|
||
networks:
|
||
- hm-net
|
||
depends_on:
|
||
- mysql
|
||
volumes:
|
||
- ./nacos/init.d:/docker-entrypoint-init.d # 如果需要额外初始化脚本,可选
|
||
```
|
||
|
||
启动完成后,访问地址:http://ip:8848/nacos/
|
||
|
||
初始账号密码都是nacos
|
||
|
||
|
||
|
||
### 服务注册
|
||
|
||
1.在`item-service`的`pom.xml`中添加依赖:
|
||
|
||
```xml
|
||
<!--nacos 服务注册发现-->
|
||
<dependency>
|
||
<groupId>com.alibaba.cloud</groupId>
|
||
<artifactId>spring-cloud-starter-alibaba-nacos-discovery</artifactId>
|
||
</dependency>
|
||
```
|
||
|
||
2.配置Nacos
|
||
|
||
在`item-service`的`application.yml`中添加nacos地址配置:
|
||
|
||
```yml
|
||
spring:
|
||
application:
|
||
name: item-service #服务名
|
||
cloud:
|
||
nacos:
|
||
server-addr: 124.71.159.***:8848 # nacos地址
|
||
```
|
||
|
||
注意,服务注册默认连9848端口!云服务需要开启该端口!
|
||
|
||

|
||
|
||
配置里的item-service就是服务名!
|
||
|
||
|
||
|
||
### 服务发现
|
||
|
||
前两步同服务注册
|
||
|
||
3.通过DiscoveryClient发现服务实例列表,然后通过负载均衡算法,选择一个实例去调用
|
||
|
||
discoveryClient发现服务 + restTemplate远程调用
|
||
|
||
```java
|
||
@Service
|
||
public class CartServiceImpl {
|
||
|
||
@Autowired
|
||
private DiscoveryClient discoveryClient; // 注入 DiscoveryClient
|
||
|
||
@Autowired
|
||
private RestTemplate restTemplate; // 用于发 HTTP 请求
|
||
|
||
private void handleCartItems(List<CartVO> vos) {
|
||
// 1. 获取商品 id 列表
|
||
Set<Long> itemIds = vos.stream()
|
||
.map(CartVO::getItemId)
|
||
.collect(Collectors.toSet());
|
||
|
||
// 2.1. 发现 item-service 服务的实例列表
|
||
List<ServiceInstance> instances = discoveryClient.getInstances("item-service");
|
||
|
||
// 2.2. 负载均衡:随机挑选一个实例
|
||
ServiceInstance instance = instances.get(
|
||
RandomUtil.randomInt(instances.size())
|
||
);
|
||
|
||
// 2.3. 发送请求,查询商品详情
|
||
String url = instance.getUri().toString() + "/items?ids={ids}";
|
||
ResponseEntity<List<ItemDTO>> response = restTemplate.exchange(
|
||
url,
|
||
HttpMethod.GET,
|
||
null,
|
||
new ParameterizedTypeReference<List<ItemDTO>>() {},
|
||
String.join(",", itemIds)
|
||
);
|
||
|
||
// 2.4. 处理结果
|
||
if (response.getStatusCode().is2xxSuccessful()) {
|
||
List<ItemDTO> items = response.getBody();
|
||
// … 后续处理 …
|
||
} else {
|
||
throw new RuntimeException("查询商品失败: " + response.getStatusCode());
|
||
}
|
||
}
|
||
}
|
||
```
|
||
|
||
|
||
|
||
### OpenFeign
|
||
|
||
让**远程调用像本地方法调用一样简单**
|
||
|
||
#### 快速入门
|
||
|
||
1.引入依赖
|
||
|
||
```xml
|
||
<!--openFeign-->
|
||
<dependency>
|
||
<groupId>org.springframework.cloud</groupId>
|
||
<artifactId>spring-cloud-starter-openfeign</artifactId>
|
||
</dependency>
|
||
<!--负载均衡器-->
|
||
<dependency>
|
||
<groupId>org.springframework.cloud</groupId>
|
||
<artifactId>spring-cloud-starter-loadbalancer</artifactId>
|
||
</dependency>
|
||
```
|
||
|
||
2.启用OpenFeign
|
||
|
||
在服务调用者`cart-service`的`CartApplication`启动类上添加注解:
|
||
|
||
`@EnableFeignClients`
|
||
|
||
3.编写OpenFeign客户端
|
||
|
||
在`cart-service`中,定义一个新的接口,编写Feign客户端:
|
||
|
||
```java
|
||
@FeignClient("item-service")
|
||
public interface ItemClient {
|
||
|
||
@GetMapping("/items")
|
||
List<ItemDTO> queryItemByIds(@RequestParam("ids") Collection<Long> ids);
|
||
}
|
||
```
|
||
|
||
`queryItemByIds`这个方法名可以随便取,但`@GetMapping("/items")` 和 `@RequestParam("ids")` 要跟 item-service 服务中实际暴露的接口路径和参数名保持一致(直接参考服务提供者的Controller层对应方法对应即可);
|
||
|
||
一个客户端对应一个服务,可以在ItemClient里面写多个方法。
|
||
|
||
4.使用
|
||
|
||
```java
|
||
List<ItemDTO> items = itemClient.queryItemByIds(Arrays.asList(1L, 2L, 3L));
|
||
```
|
||
|
||
Feign 会帮你把 `ids=[1,2,3]` 序列化成一个 HTTP GET 请求,URL 形如:
|
||
|
||
```text
|
||
GET http://item-service/items?ids=1&ids=2&ids=3
|
||
```
|
||
|
||
|
||
|
||
#### 连接池
|
||
|
||
Feign底层发起http请求,依赖于其它的框架。其底层支持的http客户端实现包括:
|
||
|
||
- HttpURLConnection:默认实现,不支持连接池
|
||
- Apache HttpClient :支持连接池
|
||
- OKHttp:支持连接池
|
||
|
||
这里用带有连接池的HttpClient 替换默认的
|
||
|
||
1.引入依赖
|
||
|
||
```xml
|
||
<dependency>
|
||
<groupId>io.github.openfeign</groupId>
|
||
<artifactId>feign-httpclient</artifactId>
|
||
</dependency>
|
||
```
|
||
|
||
2.开启连接池
|
||
|
||
```yml
|
||
feign:
|
||
httpclient:
|
||
enabled: true # 使用 Apache HttpClient(默认关闭)
|
||
```
|
||
|
||
重启服务,连接池就生效了。
|
||
|
||
|
||
|
||
#### 最佳实践
|
||
|
||
如果拆分了交易微服务(`trade-service`),它也需要远程调用`item-service`中的根据id批量查询商品功能。这个需求与`cart-service`中是一样的。那么会再次定义`ItemClient`接口导致重复编程。
|
||
|
||
- 思路1:抽取到微服务之外的公共module,需要调用client就引用该module的坐标。
|
||
|
||
<img src="https://pic.bitday.top/i/2025/05/22/jv1r9u-0.png" alt="image-20250522120106182" style="zoom:80%;" />
|
||
|
||
- 思路2:每个微服务自己抽取一个module,比如item-service,将需要共享的domain实体放在item-dto模块,需要供其他微服务调用的cilent放在item-api模块,自己维护自己的,然后其他微服务引入maven坐标直接使用。
|
||
|
||
<img src="https://pic.bitday.top/i/2025/05/22/j5mb6l-0.png" alt="image-20250522115834339" style="zoom:80%;" />
|
||
|
||
大型项目思路2更清晰、更合理。但这里选择思路1,方便起见。
|
||
|
||
|
||
|
||
**拆分之后重启报错:**`Parameter 0 of constructor in com.hmall.cart.service.impl.CartServiceImpl required a bean of type 'com.hmall.api.client.ItemClient' that could not be found.`
|
||
|
||
是因为:Feign Client 没被扫描到,Spring Boot 默认只会在主应用类所在包及其子包里扫描 `@FeignClient`。
|
||
|
||
需要额外设置basePackages
|
||
|
||
```java
|
||
package com.hmall.cart;
|
||
@MapperScan("com.hmall.cart.mapper")
|
||
@EnableFeignClients(basePackages= "com.hmall.api.client")
|
||
@SpringBootApplication
|
||
public class CartApplication {
|
||
public static void main(String[] args) {
|
||
SpringApplication.run(CartApplication.class, args);
|
||
}
|
||
}
|
||
```
|
||
|
||
|
||
|
||
## 网关
|
||
|
||
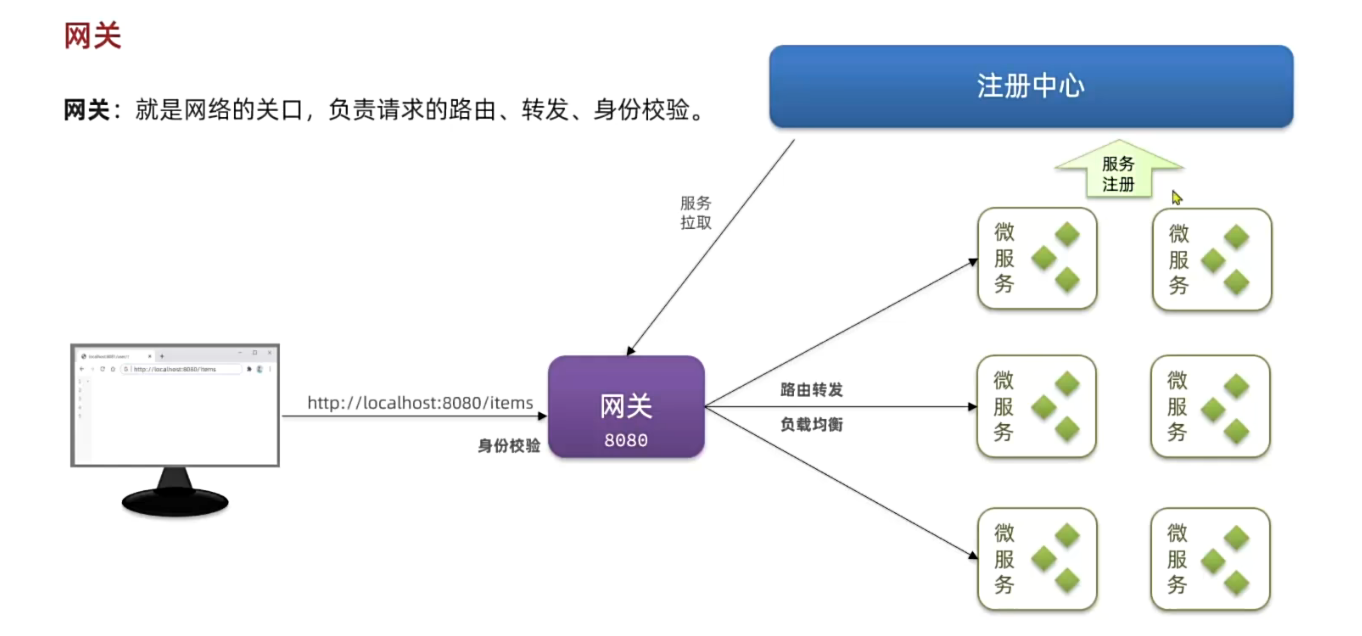
在微服务拆分后的联调过程中,经常会遇到以下问题:
|
||
|
||
- 不同业务数据分布在各自微服务,需要维护**多套地址和端口**,调用繁琐且易错;
|
||
- 前端无法直接访问注册中心(如 Nacos),无法实时获取服务列表,导致接口切换不灵活。
|
||
|
||
此外,单体架构下只需完成一次**登录与身份校验**,所有业务模块即可共享用户信息;但在微服务架构中:
|
||
|
||
- 每个微服务是否都要重复实现登录校验和用户信息获取?
|
||
- 服务间调用时,如何安全、可靠地传递用户身份?
|
||
|
||
通过引入 **API 网关**,我们可以在**统一入口处解决**以上问题:它提供动态路由与负载均衡,前端**只需调用一个地址**;它与注册中心集成,实时路由调整;它还在网关层集中完成登录鉴权和用户信息透传,下游服务无需重复实现安全逻辑。
|
||
|
||
|
||
|
||
### 快速入门
|
||
|
||
网关本身也是一个独立的微服务,因此也需要创建一个模块开发功能。大概步骤如下:
|
||
|
||
- 创建网关微服务
|
||
- 引入SpringCloudGateway、NacosDiscovery依赖
|
||
- 编写启动类
|
||
- 配置网关路由
|
||
|
||
1.依赖引入:
|
||
|
||
```xml
|
||
<!-- 网关 -->
|
||
<dependency>
|
||
<groupId>org.springframework.cloud</groupId>
|
||
<artifactId>spring-cloud-starter-gateway</artifactId>
|
||
</dependency>
|
||
|
||
<!-- Nacos Discovery -->
|
||
<dependency>
|
||
<groupId>com.alibaba.cloud</groupId>
|
||
<artifactId>spring-cloud-starter-alibaba-nacos-discovery</artifactId>
|
||
</dependency>
|
||
|
||
<!-- 负载均衡 -->
|
||
<dependency>
|
||
<groupId>org.springframework.cloud</groupId>
|
||
<artifactId>spring-cloud-starter-loadbalancer</artifactId>
|
||
</dependency>
|
||
```
|
||
|
||
2.配置网关路由
|
||
|
||
**`id`**:给这条路由起个唯一的标识,方便你在日志、监控里看是哪个规则。(最好和服务名一致)
|
||
|
||
**`uri: lb://xxx`**:`xxx` 必须和服务注册时的名字一模一样(比如 `Item-service` 或全大写 `ITEM-SERVICE`,取决于你在微服务启动时 `spring.application.name` 配置)
|
||
|
||
```yml
|
||
server:
|
||
port: 8080
|
||
spring:
|
||
application:
|
||
name: gateway
|
||
cloud:
|
||
nacos:
|
||
server-addr: 192.168.150.101:8848
|
||
gateway:
|
||
routes:
|
||
- id: item # 路由规则id,自定义,唯一
|
||
uri: lb://item-service # 路由的目标服务,lb代表负载均衡,会从注册中心拉取服务列表
|
||
predicates: # 路由断言,判断当前请求是否符合当前规则,符合则路由到目标服务
|
||
- Path=/items/**,/search/** # 支持多个路径模式,用逗号隔开
|
||
- id: cart
|
||
uri: lb://cart-service
|
||
predicates:
|
||
- Path=/carts/**
|
||
- id: user
|
||
uri: lb://user-service
|
||
predicates:
|
||
- Path=/users/**,/addresses/**
|
||
- id: trade
|
||
uri: lb://trade-service
|
||
predicates:
|
||
- Path=/orders/**
|
||
- id: pay
|
||
uri: lb://pay-service
|
||
predicates:
|
||
- Path=/pay-orders/**
|
||
|
||
```
|
||
|
||
`predicates`:路由断言,其实就是匹配条件
|
||
|
||
| After | 是某个时间点后的请求 | - After=2037-01-20T17:42:47.789-07:00[America/Denver] |
|
||
| ------ | ------------------------ | ----------------------------------------------------- |
|
||
| Before | 是某个时间点之前的请求 | - Before=2031-04-13T15:14:47.433+08:00[Asia/Shanghai] |
|
||
| Path | 请求路径必须符合指定规则 | - Path=/red/{segment},/blue/** |
|
||
|
||
如果(predicates)符合这些规则,就把请求送到(uri)这里去。
|
||
|
||
|
||
|
||
**Ant风格路径**
|
||
|
||
用来灵活地匹配文件或请求路径:
|
||
|
||
`?`:匹配单个字符(除了 `/`)。
|
||
|
||
- 例如,`/user/??/profile` 能匹配 `/user/ab/profile`,但不能匹配 `/user/a/profile` 或 `/user/abc/profile`。
|
||
|
||
`*`:匹配任意数量的字符(零 个或 多个),但不跨越路径分隔符 `/`。
|
||
|
||
- 例如,`/images/*.png` 能匹配 `/images/a.png`、`/images/logo.png`,却不匹配 `/images/icons/logo.png`。
|
||
|
||
`**`:匹配任意层级的路径(可以跨越多个 `/`)。
|
||
|
||
- 例如,`/static/**` 能匹配 `/static/`、`/static/css/style.css`、`/static/js/lib/foo.js`,甚至 `/static/a/b/c/d`。
|
||
|
||
`AntPathMatcher` 是 Spring Framework 提供的一个工具类,用来对“Ant 风格”路径模式做匹配
|
||
|
||
```java
|
||
@Component
|
||
@ConfigurationProperties(prefix = "auth")
|
||
public class AuthProperties {
|
||
private List<String> excludePaths;
|
||
// getter + setter
|
||
}
|
||
|
||
@Component
|
||
public class AuthInterceptor implements HandlerInterceptor {
|
||
private final AntPathMatcher pathMatcher = new AntPathMatcher();
|
||
private final List<String> exclude;
|
||
|
||
public AuthInterceptor(AuthProperties props) {
|
||
this.exclude = props.getExcludePaths();
|
||
}
|
||
|
||
@Override
|
||
public boolean preHandle(HttpServletRequest req,
|
||
HttpServletResponse res,
|
||
Object handler) {
|
||
String path = req.getRequestURI(); // e.g. "/search/books/123"
|
||
|
||
// 检查是否匹配任何一个“放行”模式
|
||
for (String pattern : exclude) {
|
||
if (pathMatcher.match(pattern, path)) {
|
||
return true; // 放行,不做 auth
|
||
}
|
||
}
|
||
|
||
// 否则执行认证逻辑
|
||
// ...
|
||
return false;
|
||
}
|
||
}
|
||
```
|
||
|
||
当然
|
||
|
||
```yaml
|
||
predicates:
|
||
- Path=/users/**,/addresses/**
|
||
```
|
||
|
||
这里不需要手写JAVA逻辑进行路径匹配,因为Gateway自动实现了。但是后面自定义Gateway过滤器的时候就需要`AntPathMatcher`了!
|
||
|
||
|
||
|
||
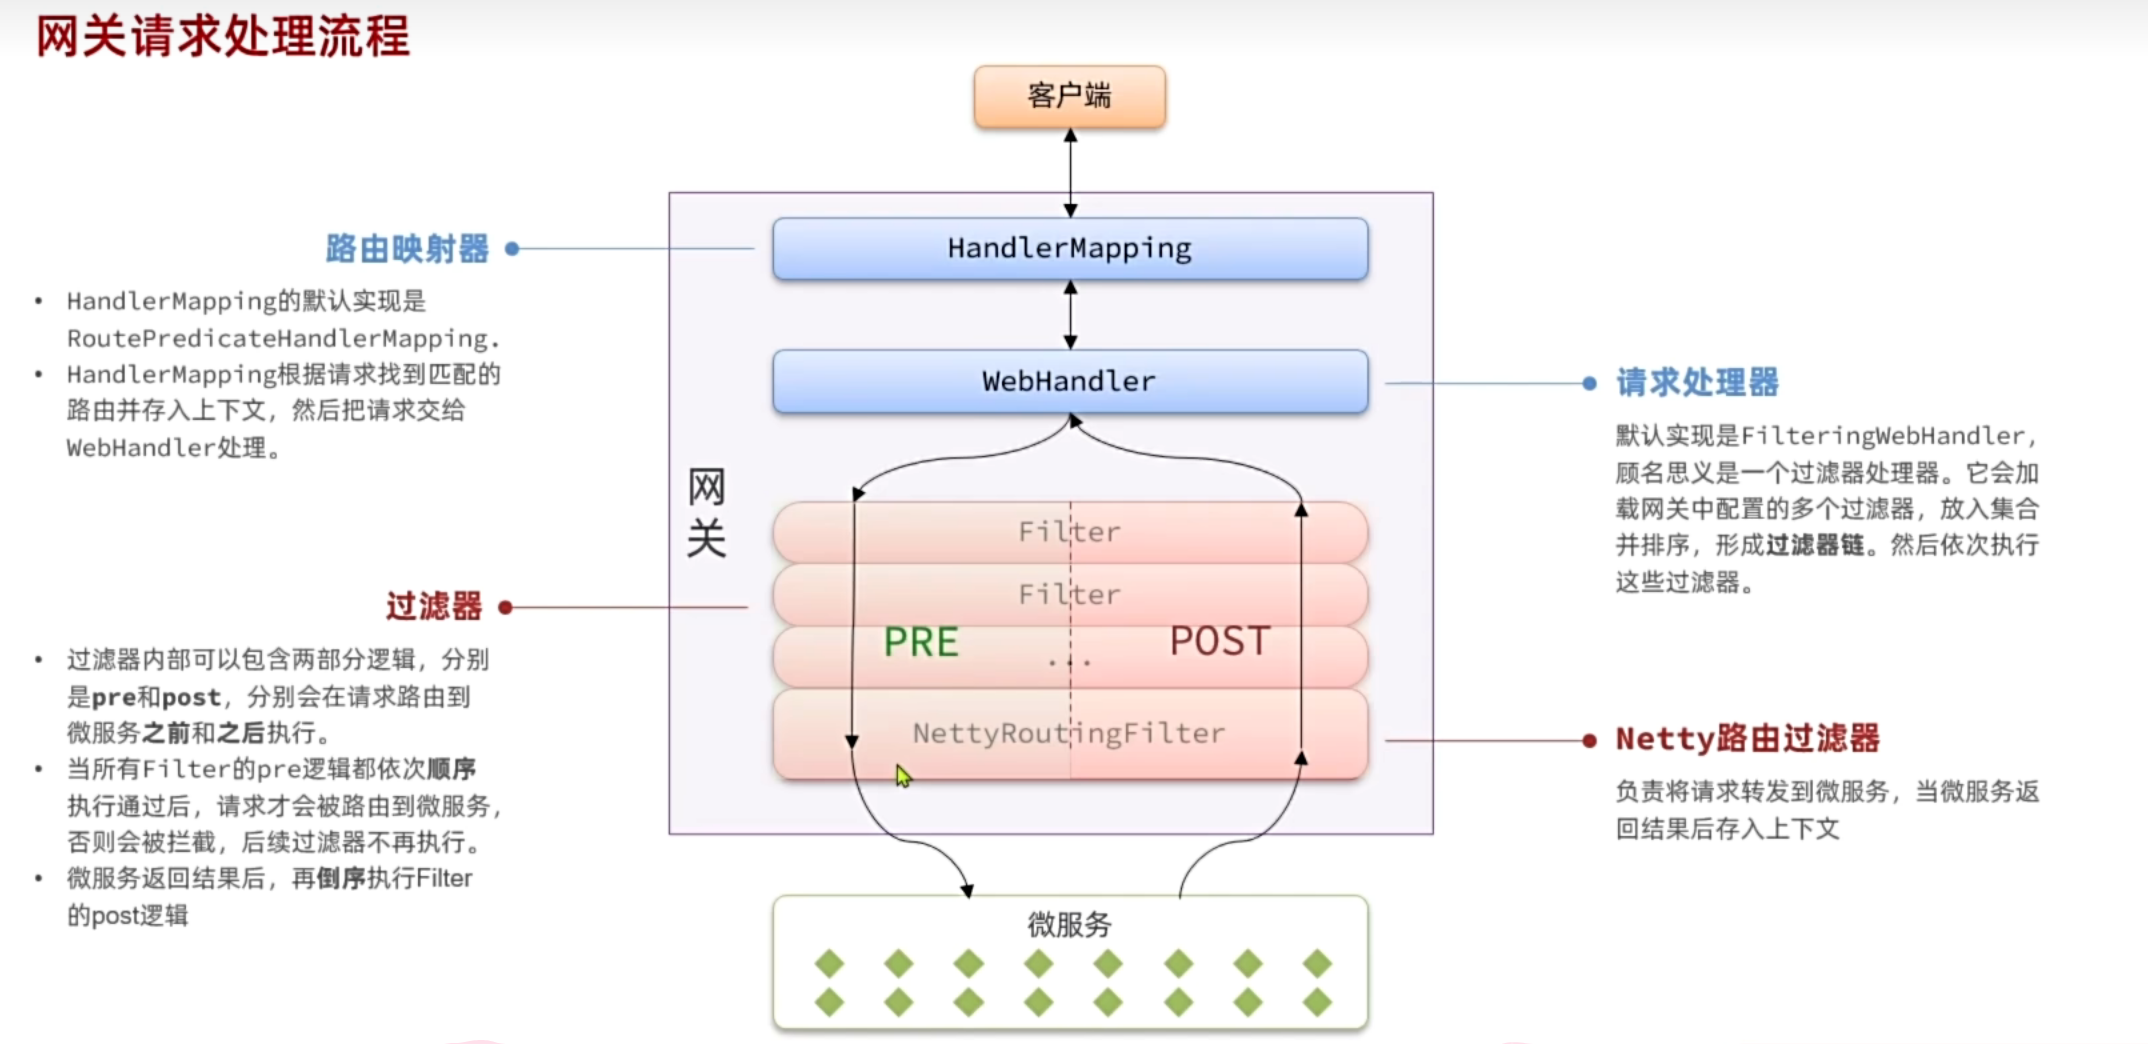
### 登录校验
|
||
|
||
|
||
|
||
|
||
|
||
我们需要实现一个网关过滤器,有两种可选:
|
||
|
||
- [ ] **`GatewayFilter`**:路由过滤器,作用范围比较灵活,可以是任意指定的路由`Route`.
|
||
- [x] **`GlobalFilter`**:全局过滤器,作用范围是所有路由,不可配置。
|
||
|
||
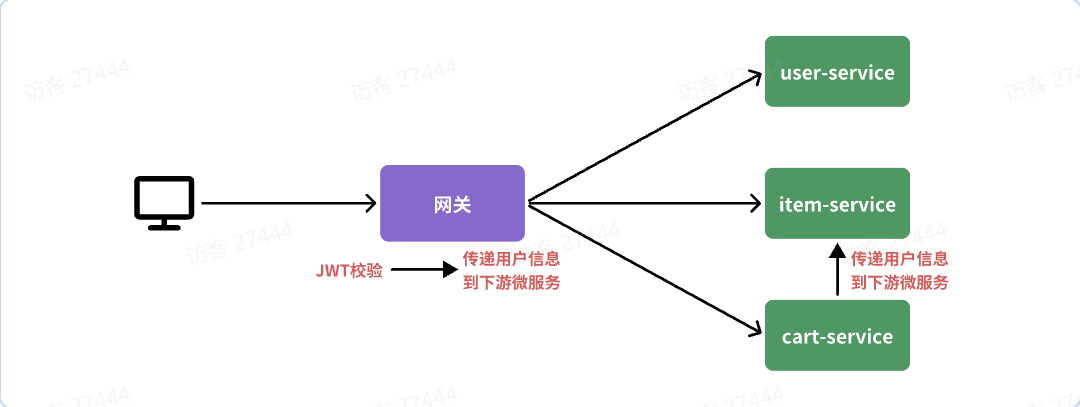
网关需要实现两个功能:1.JWT**校验** 2.将用户信息**传递**给微服务
|
||
|
||
#### 网关校验+存用户信息
|
||
|
||
```java
|
||
@Component
|
||
@RequiredArgsConstructor
|
||
@EnableConfigurationProperties(AuthProperties.class)
|
||
public class AuthGlobalFilter implements GlobalFilter, Ordered {
|
||
|
||
private final JwtTool jwtTool;
|
||
|
||
private final AuthProperties authProperties;
|
||
|
||
private final AntPathMatcher antPathMatcher = new AntPathMatcher();
|
||
|
||
@Override
|
||
public Mono<Void> filter(ServerWebExchange exchange, GatewayFilterChain chain) {
|
||
// 1.获取Request
|
||
ServerHttpRequest request = exchange.getRequest();
|
||
// 2.判断是否不需要拦截
|
||
if(isExclude(request.getPath().toString())){
|
||
// 无需拦截,直接放行
|
||
return chain.filter(exchange);
|
||
}
|
||
// 3.获取请求头中的token
|
||
String token = null;
|
||
List<String> headers = request.getHeaders().get("authorization");
|
||
if (!CollUtils.isEmpty(headers)) {
|
||
token = headers.get(0);
|
||
}
|
||
// 4.校验并解析token
|
||
Long userId = null;
|
||
try {
|
||
userId = jwtTool.parseToken(token);
|
||
} catch (UnauthorizedException e) {
|
||
// 如果无效,拦截
|
||
ServerHttpResponse response = exchange.getResponse();
|
||
response.setRawStatusCode(401);
|
||
return response.setComplete();
|
||
}
|
||
|
||
// 5.如果有效,传递用户信息
|
||
String userInfo = userId.toString();
|
||
ServerWebExchange modifiedExchange = exchange.mutate()
|
||
.request(builder -> builder.header("user-info", userInfo))
|
||
.build();
|
||
// 6.放行
|
||
return chain.filter(modifiedExchange);
|
||
}
|
||
|
||
private boolean isExclude(String antPath) {
|
||
for (String pathPattern : authProperties.getExcludePaths()) {
|
||
if(antPathMatcher.match(pathPattern, antPath)){
|
||
return true;
|
||
}
|
||
}
|
||
return false;
|
||
}
|
||
|
||
@Override
|
||
public int getOrder() {
|
||
return 0;
|
||
}
|
||
}
|
||
```
|
||
|
||
- 实现`Ordered`接口中的 `getOrder` 方法,数字越小过滤器执行优先级越高。
|
||
- `exchange` 可以获得上下文信息。
|
||
|
||
|
||
|
||
#### 拦截器获取用户
|
||
|
||
在Common模块中设置:
|
||
|
||
只负责保存 `userinfo` 到 `UserContext` ,不负责拦截,因为拦截在前面的过滤器做了。
|
||
|
||
```java
|
||
public class UserInfoInterceptor implements HandlerInterceptor {
|
||
@Override
|
||
public boolean preHandle(HttpServletRequest request, HttpServletResponse response, Object handler) throws Exception {
|
||
// 1.获取请求头中的用户信息
|
||
String userInfo = request.getHeader("user-info");
|
||
// 2.判断是否为空
|
||
if (StrUtil.isNotBlank(userInfo)) {
|
||
// 不为空,保存到ThreadLocal
|
||
UserContext.setUser(Long.valueOf(userInfo));
|
||
}
|
||
// 3.放行
|
||
return true;
|
||
}
|
||
|
||
@Override
|
||
public void afterCompletion(HttpServletRequest request, HttpServletResponse response, Object handler, Exception ex) throws Exception {
|
||
// 移除用户
|
||
UserContext.removeUser();
|
||
}
|
||
}
|
||
```
|
||
|
||
配置类:
|
||
|
||
```java
|
||
@Configuration
|
||
@ConditionalOnClass(DispatcherServlet.class)
|
||
public class MvcConfig implements WebMvcConfigurer {
|
||
@Override
|
||
public void addInterceptors(InterceptorRegistry registry) {
|
||
registry.addInterceptor(new UserInfoInterceptor());
|
||
}
|
||
}
|
||
```
|
||
|
||
注意:Spring Boot 只会从主启动类所在的包(及其子包)去扫描组件。 `common` 包跟 `item`、`cart` 等微服务模块是平级的,无法被扫描到。解决方法:
|
||
|
||
1.在每个微服务的启动类上添加包扫描
|
||
|
||
```java
|
||
@SpringBootApplication(
|
||
scanBasePackages = {"com.hmall.item","com.hmall.common"}
|
||
)
|
||
```
|
||
|
||
主包以及common包
|
||
|
||
2.在主应用的启动类上用 `@Import`:
|
||
|
||
```java
|
||
@SpringBootApplication
|
||
@Import(com.hmall.common.interceptors.MvcConfig.class)
|
||
public class Application { … }
|
||
```
|
||
|
||
**3.前两种方法的问题在于每个微服务模块中都需要写common的引入**
|
||
|
||
因此可以把`common` 模块做成 Spring Boot **自动配置**
|
||
|
||
1)在`common/src/main/resources/META-INF/spring.factories` 里声明:
|
||
|
||
```text
|
||
org.springframework.boot.autoconfigure.EnableAutoConfiguration=\
|
||
com.hmall.common.config.MvcConfig
|
||
```
|
||
|
||
2)在 `common` 模块里给 `MvcConfig` 加上
|
||
|
||
```java
|
||
@Configuration
|
||
@ConditionalOnClass(DispatcherServlet.class) //网关不生效 spring服务生效
|
||
public class MvcConfig { … }
|
||
```
|
||
|
||
3)然后在任何微服务的 `pom.xml`里只要依赖了这个 common jar,就会自动加载拦截器配置,根本不需要改服务里的 `@SpringBootApplication`。
|
||
|
||
|
||
|
||
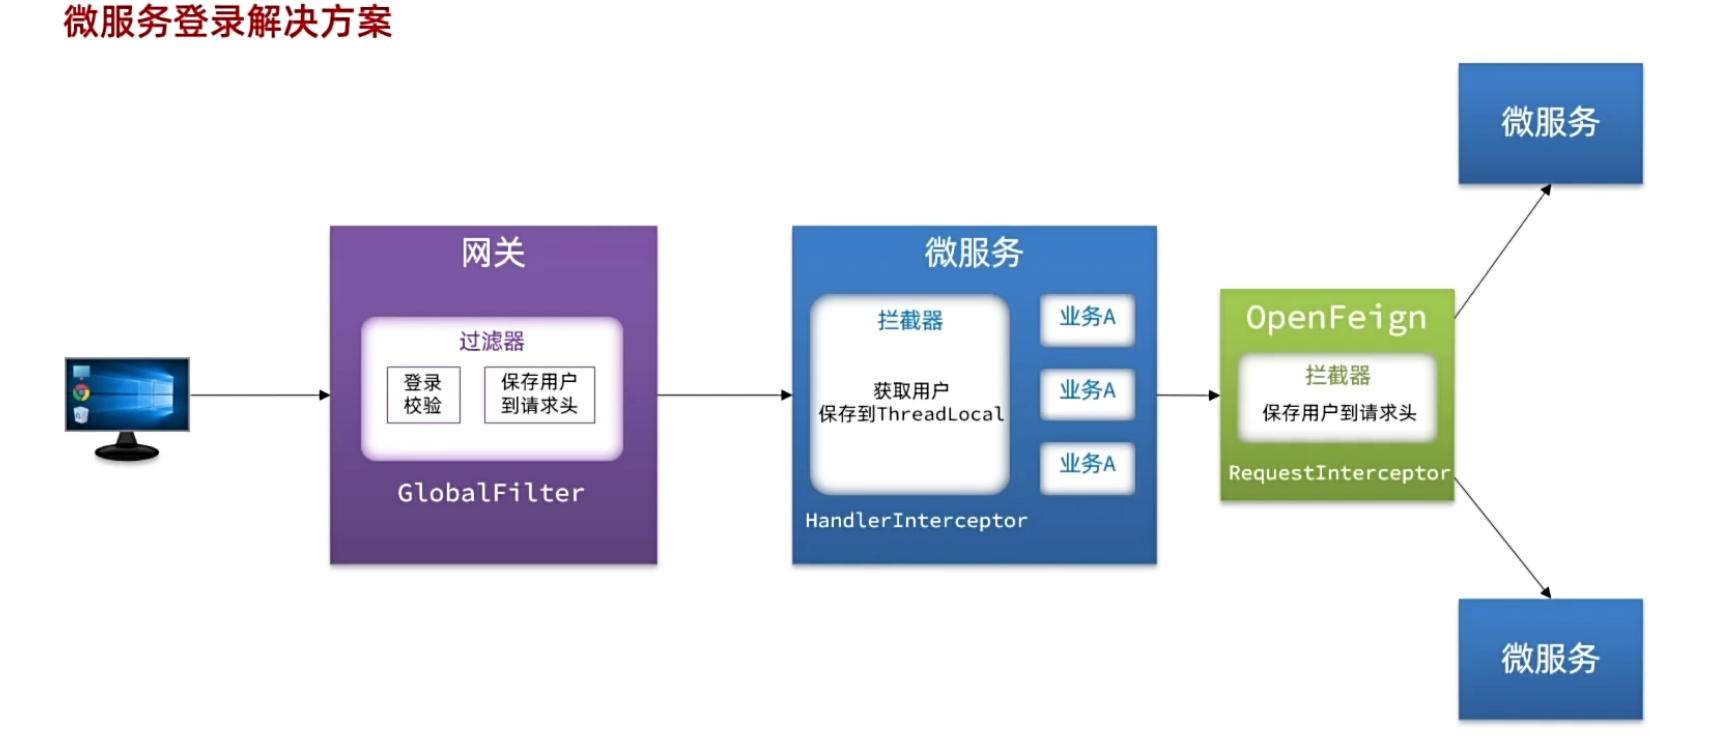
#### OpenFeign传递用户
|
||
|
||
前端发起的请求都会经过网关再到微服务,微服务可以轻松获取登录用户信息。但是,有些业务是比较复杂的,请求到达微服务后还需要调用其它多个微服务,**微服务之间的调用**无法传递用户信息,因为**不在一个上下文**(线程)中!
|
||
|
||
解决思路:**让每一个由OpenFeign发起的请求自动携带登录用户信息**。要借助Feign中提供的一个拦截器接口:`feign.RequestInterceptor`
|
||
|
||
```java
|
||
public class DefaultFeignConfig {
|
||
@Bean
|
||
public RequestInterceptor userInfoRequestInterceptor(){
|
||
return new RequestInterceptor() {
|
||
@Override
|
||
public void apply(RequestTemplate template) {
|
||
// 获取登录用户
|
||
Long userId = UserContext.getUser();
|
||
if(userId == null) {
|
||
// 如果为空则直接跳过
|
||
return;
|
||
}
|
||
// 如果不为空则放入请求头中,传递给下游微服务
|
||
template.header("user-info", userId.toString());
|
||
}
|
||
};
|
||
}
|
||
}
|
||
```
|
||
|
||
同时,需要在服务调用者的启动类上添加:
|
||
|
||
```java
|
||
@EnableFeignClients(
|
||
basePackages = "com.hmall.api.client",
|
||
defaultConfiguration = DefaultFeignConfig.class
|
||
)
|
||
@SpringBootApplication
|
||
public class PayApplication {
|
||
```
|
||
|
||
这样 `DefaultFeignConfig.class` 会对于所有Client类生效
|
||
|
||
|
||
|
||
```java
|
||
@FeignClient(value = "item-service",
|
||
configuration = DefaultFeignConfig.class)
|
||
public interface ItemClient {
|
||
@GetMapping("/items")
|
||
List<ItemDTO> queryItemByIds(@RequestParam("ids") Collection<Long> ids);
|
||
}
|
||
```
|
||
|
||
这种只对ItemClient生效!
|
||
|
||
|
||
|
||
**整体流程图**
|
||
|
||
|
||
|
||
|
||
|
||
## 配置管理
|
||
|
||
微服务共享的配置可以统一交给**Nacos**保存和管理,在Nacos控制台修改配置后,Nacos会将配置变更推送给相关的微服务,并且无需重启即可生效,实现**配置热更新**。
|
||
|
||
### 配置共享
|
||
|
||
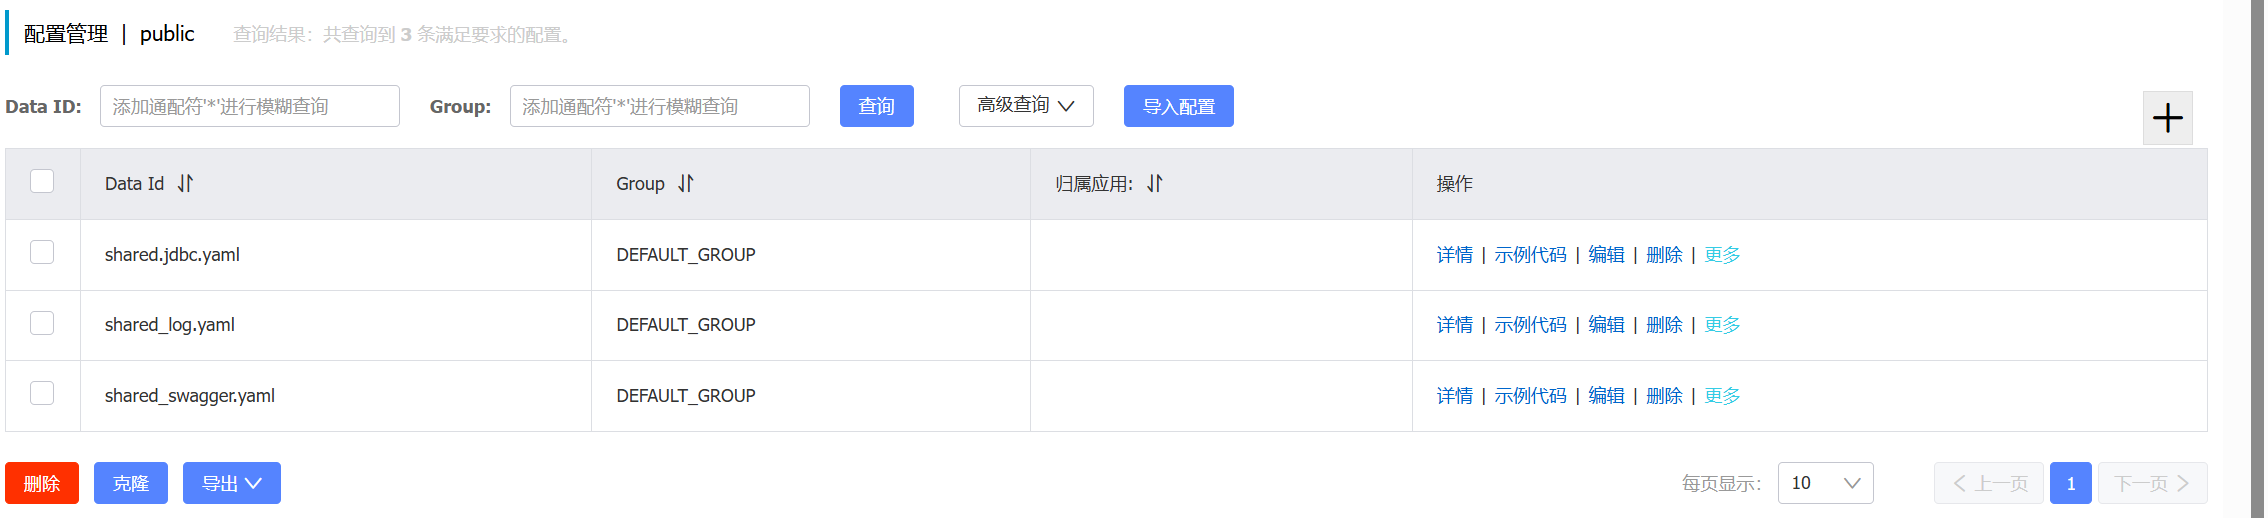
**在nacos控制台的配置管理中添加配置文件**
|
||
|
||
- `数据库ip`:通过`${hm.db.host:192.168.150.101}`配置了默认值为`192.168.150.101`,同时允许通过`${hm.db.host}`来覆盖默认值
|
||
|
||
|
||
|
||
**配置读取流程:**
|
||
|
||
<img src="https://pic.bitday.top/i/2025/05/24/s9s6am-0.png" alt="image-20250524170952380" style="zoom:67%;" />
|
||
|
||
微服务整合Nacos配置管理的步骤如下:
|
||
|
||
1)引入依赖:
|
||
|
||
```xml
|
||
<!--nacos配置管理-->
|
||
<dependency>
|
||
<groupId>com.alibaba.cloud</groupId>
|
||
<artifactId>spring-cloud-starter-alibaba-nacos-config</artifactId>
|
||
</dependency>
|
||
<!--读取bootstrap文件-->
|
||
<dependency>
|
||
<groupId>org.springframework.cloud</groupId>
|
||
<artifactId>spring-cloud-starter-bootstrap</artifactId>
|
||
</dependency>
|
||
```
|
||
|
||
2)新建bootstrap.yaml
|
||
|
||
在cart-service中的resources目录新建一个bootstrap.yaml文件:
|
||
|
||
主要给nacos的信息
|
||
|
||
```yml
|
||
spring:
|
||
application:
|
||
name: cart-service # 服务名称
|
||
profiles:
|
||
active: dev
|
||
cloud:
|
||
nacos:
|
||
server-addr: 192.168.150.101 # nacos地址
|
||
config:
|
||
file-extension: yaml # 文件后缀名
|
||
shared-configs: # 共享配置
|
||
- dataId: shared-jdbc.yaml # 共享mybatis配置
|
||
- dataId: shared-log.yaml # 共享日志配置
|
||
- dataId: shared-swagger.yaml # 共享日志配置
|
||
```
|
||
|
||
3)修改application.yaml
|
||
|
||
```yml
|
||
server:
|
||
port: 8082
|
||
feign:
|
||
okhttp:
|
||
enabled: true # 开启OKHttp连接池支持
|
||
hm:
|
||
swagger:
|
||
title: 购物车服务接口文档
|
||
package: com.hmall.cart.controller
|
||
db:
|
||
database: hm-cart
|
||
```
|
||
|
||
|
||
|
||
### 配置热更新
|
||
|
||
有很多的业务相关参数,将来可能会根据实际情况临时调整,如何**不重启服务**,直接更改配置文件生效呢?
|
||
|
||
示例:购物车中的商品上限数量需动态调整。
|
||
|
||
**1)在nacos中添加配置**
|
||
|
||
在nacos中添加一个配置文件,将购物车的上限数量添加到配置中:
|
||
|
||
文件的dataId格式:
|
||
|
||
```text
|
||
[服务名]-[spring.active.profile].[后缀名]
|
||
```
|
||
|
||
文件名称由三部分组成:
|
||
|
||
- **`服务名`**:我们是购物车服务,所以是`cart-service`
|
||
- **`spring.active.profile`**:就是spring boot中的`spring.active.profile`,可以省略,则所有profile共享该配置(不管local还是dev还是prod)
|
||
- **`后缀名`**:例如yaml
|
||
|
||
示例:`cart-service.yaml`
|
||
|
||
```YAML
|
||
hm:
|
||
cart:
|
||
maxAmount: 1 # 购物车商品数量上限
|
||
```
|
||
|
||
**2)在微服务中配置**
|
||
|
||
```java
|
||
@Data
|
||
@Component
|
||
@ConfigurationProperties(prefix = "hm.cart")
|
||
public class CartProperties {
|
||
private Integer maxAmount;
|
||
}
|
||
```
|
||
|
||
**3)下次,只需改nacos中的配置文件 =》发布,即可实现热更新。**
|
||
|
||
|
||
|
||
### 动态路由
|
||
|
||
**1.监听Nacos的配置变更**
|
||
|
||
`NacosConfigManager`可以获取`ConfigService `配置信息
|
||
|
||
`String configInfo = nacosConfigManager.getConfigService()`
|
||
|
||
内容是带换行和缩进的 YAML 文本或者 **JSON 格式**(取决于你的配置文件格式):
|
||
|
||
```json
|
||
//多条路由
|
||
[
|
||
{
|
||
"id": "user-service",
|
||
"uri": "lb://USER-SERVICE",
|
||
"predicates": [
|
||
"Path=/user/**"
|
||
],
|
||
"filters": [
|
||
"StripPrefix=1"
|
||
]
|
||
},
|
||
{
|
||
"id": "order-service",
|
||
"uri": "lb://ORDER-SERVICE",
|
||
"predicates": [
|
||
"Path=/order/**"
|
||
],
|
||
"filters": [
|
||
"StripPrefix=1",
|
||
"AddRequestHeader=X-Order-Source,cloud"
|
||
]
|
||
}
|
||
]
|
||
```
|
||
|
||
因为YAML格式解析不方便,故配置文件采用 JSON 格式保存、读取、解析!
|
||
|
||
|
||
|
||
```Java
|
||
String getConfigAndSignListener(
|
||
String dataId, // 配置文件id
|
||
String group, // 配置组,走默认
|
||
long timeoutMs, // 读取配置的超时时间
|
||
Listener listener // 监听器
|
||
) throws NacosException;
|
||
```
|
||
|
||
`getConfigAndSignListener`既可以在第一次**读配置**文件又可以在后面进行**监听**
|
||
|
||
每当 Nacos 上该配置有变更,会触发其内部`receiveConfigInfo(...)` 方法
|
||
|
||
|
||
|
||
**2.然后手动把最新的路由更新到路由表中。**
|
||
|
||
`RouteDefinitionWriter`
|
||
|
||
```java
|
||
public interface RouteDefinitionWriter {
|
||
/**
|
||
* 更新路由到路由表,如果路由id重复,则会覆盖旧的路由
|
||
*/
|
||
Mono<Void> save(Mono<RouteDefinition> route);
|
||
/**
|
||
* 根据路由id删除某个路由
|
||
*/
|
||
Mono<Void> delete(Mono<String> routeId);
|
||
|
||
}
|
||
```
|
||
|
||
|
||
|
||
```java
|
||
@Slf4j
|
||
@Component
|
||
@RequiredArgsConstructor
|
||
public class DynamicRouteLoader {
|
||
|
||
private final RouteDefinitionWriter writer;
|
||
private final NacosConfigManager nacosConfigManager;
|
||
|
||
// 路由配置文件的id和分组
|
||
private final String dataId = "gateway-routes.json";
|
||
private final String group = "DEFAULT_GROUP";
|
||
// 保存更新过的路由id
|
||
private final Set<String> routeIds = new HashSet<>(); //order-service ...
|
||
|
||
@PostConstruct
|
||
public void initRouteConfigListener() throws NacosException {
|
||
// 1.注册监听器并首次拉取配置
|
||
String configInfo = nacosConfigManager.getConfigService()
|
||
.getConfigAndSignListener(dataId, group, 5000, new Listener() {
|
||
@Override
|
||
public Executor getExecutor() {
|
||
return null;
|
||
}
|
||
|
||
@Override
|
||
public void receiveConfigInfo(String configInfo) {
|
||
updateConfigInfo(configInfo);
|
||
}
|
||
});
|
||
// 2.首次启动时,更新一次配置
|
||
updateConfigInfo(configInfo);
|
||
}
|
||
|
||
private void updateConfigInfo(String configInfo) {
|
||
log.debug("监听到路由配置变更,{}", configInfo);
|
||
// 1.反序列化
|
||
List<RouteDefinition> routeDefinitions = JSONUtil.toList(configInfo, RouteDefinition.class);
|
||
// 2.更新前先清空旧路由
|
||
// 2.1.清除旧路由
|
||
for (String routeId : routeIds) {
|
||
writer.delete(Mono.just(routeId)).subscribe();
|
||
}
|
||
routeIds.clear();
|
||
// 2.2.判断是否有新的路由要更新
|
||
if (CollUtils.isEmpty(routeDefinitions)) {
|
||
// 无新路由配置,直接结束
|
||
return;
|
||
}
|
||
// 3.更新路由
|
||
routeDefinitions.forEach(routeDefinition -> {
|
||
// 3.1.更新路由
|
||
writer.save(Mono.just(routeDefinition)).subscribe();
|
||
// 3.2.记录路由id,方便将来删除
|
||
routeIds.add(routeDefinition.getId());
|
||
});
|
||
}
|
||
}
|
||
```
|
||
|
||
可以在项目启动时先更新一次路由,后续随着配置变更通知到监听器,完成路由更新。
|
||
|
||
|
||
|
||
## 服务保护
|
||
|
||
### 服务保护方案
|
||
|
||
**1)请求限流**
|
||
|
||
**限制或控制**接口访问的并发流量,避免服务因流量激增而出现故障。
|
||
|
||
**2)线程隔离**
|
||
|
||
为了避免某个接口故障或压力过大导致整个服务不可用,我们可以限定每个接口可以使用的资源范围,也就是将其“隔离”起来。
|
||
|
||
<img src="https://pic.bitday.top/i/2025/05/25/pnn2tm-0.png" alt="image-20250525155132474" style="zoom: 80%;" />
|
||
|
||
**3)服务熔断**
|
||
|
||
线程隔离虽然避免了雪崩问题,但故障服务(商品服务)依然会拖慢购物车服务(服务调用方)的接口响应速度。
|
||
|
||
所以,我们要做两件事情:
|
||
|
||
- **编写服务降级逻辑**:就是服务调用失败后的处理逻辑,根据业务场景,可以抛出异常,也可以返回友好提示或**默认数据**。
|
||
- **异常统计和熔断**:统计服务提供方的异常比例,当比例过高表明该接口会影响到其它服务,应该拒绝调用该接口,而是直接走降级逻辑。
|
||
|
||
无非就是停止无意义的等待,直接返回Fallback方案。
|
||
|
||
|
||
|
||
### Sentinel
|
||
|
||
#### 介绍和安装
|
||
|
||
Sentinel是阿里巴巴开源的一款服务保护框架,[quick-start | Sentinel](https://sentinelguard.io/zh-cn/docs/quick-start.html)
|
||
|
||
| 特性 | Sentinel (阿里巴巴) | Hystrix (网飞) |
|
||
| -------- | ---------------------------------------------- | ---------------------------- |
|
||
| 线程隔离 | 信号量隔离 | 线程池隔离 / 信号量隔离 |
|
||
| 熔断策略 | 基于慢调用比例或异常比例 | 基于异常比率 |
|
||
| 限流 | 基于 QPS,支持流量整形 | 有限的支持 |
|
||
| Fallback | 支持 | 支持 |
|
||
| 控制台 | 开箱即用,可配置规则、查看秒级监控、机器发现等 | 不完善 |
|
||
| 配置方式 | 基于控制台,重启后失效 | 基于注解或配置文件,永久生效 |
|
||
|
||
**安装:**
|
||
|
||
1)下载jar包 https://github.com/alibaba/Sentinel/releases
|
||
|
||
2)将jar包放在任意非中文、不包含特殊字符的目录下,重命名为`sentinel-dashboard.jar`
|
||
|
||
然后运行如下命令启动控制台:
|
||
|
||
```Shell
|
||
java -Dserver.port=8090 -Dcsp.sentinel.dashboard.server=localhost:8090 -Dproject.name=sentinel-dashboard -jar sentinel-dashboard.jar
|
||
```
|
||
|
||
3)访问[http://localhost:8090](http://localhost:8080)页面,就可以看到sentinel的控制台了
|
||
|
||
账号和密码,默认都是:sentinel
|
||
|
||
**微服务整合**
|
||
|
||
1)引入依赖
|
||
|
||
```xml
|
||
<!--sentinel-->
|
||
<dependency>
|
||
<groupId>com.alibaba.cloud</groupId>
|
||
<artifactId>spring-cloud-starter-alibaba-sentinel</artifactId>
|
||
</dependency>
|
||
```
|
||
|
||
2)配置控制台
|
||
|
||
修改application.yaml文件(可以用共享配置nacos),添加如下:
|
||
|
||
```yml
|
||
spring:
|
||
cloud:
|
||
sentinel:
|
||
transport:
|
||
dashboard: localhost:8090
|
||
```
|
||
|
||
|
||
|
||
我们的SpringMVC接口是按照Restful风格设计,因此购物车的查询、删除、修改等接口全部都是`/carts`路径。默认情况下Sentinel会把路径作为簇点资源的名称,无法区分路径相同但**请求方式不同**的接口。
|
||
|
||
可以在`application.yml`中添加下面的配置 然后,**重启**服务
|
||
|
||
```yaml
|
||
spring:
|
||
cloud:
|
||
sentinel:
|
||
transport:
|
||
dashboard: localhost:8090
|
||
http-method-specify: true # 开启请求方式前缀
|
||
```
|
||
|
||
|
||
|
||
**OpenFeign整合Sentinel**
|
||
|
||
默认sentinel只会整合spring mvc中的接口。
|
||
|
||
修改cart-service模块的application.yml文件,可开启Feign的sentinel功能:
|
||
|
||
```yaml
|
||
feign:
|
||
sentinel:
|
||
enabled: true # 开启feign对sentinel的支持
|
||
```
|
||
|
||
调用的别的服务(/item-service)的接口也会显示在这。
|
||
|
||

|
||
|
||
|
||
|
||
|
||
|
||
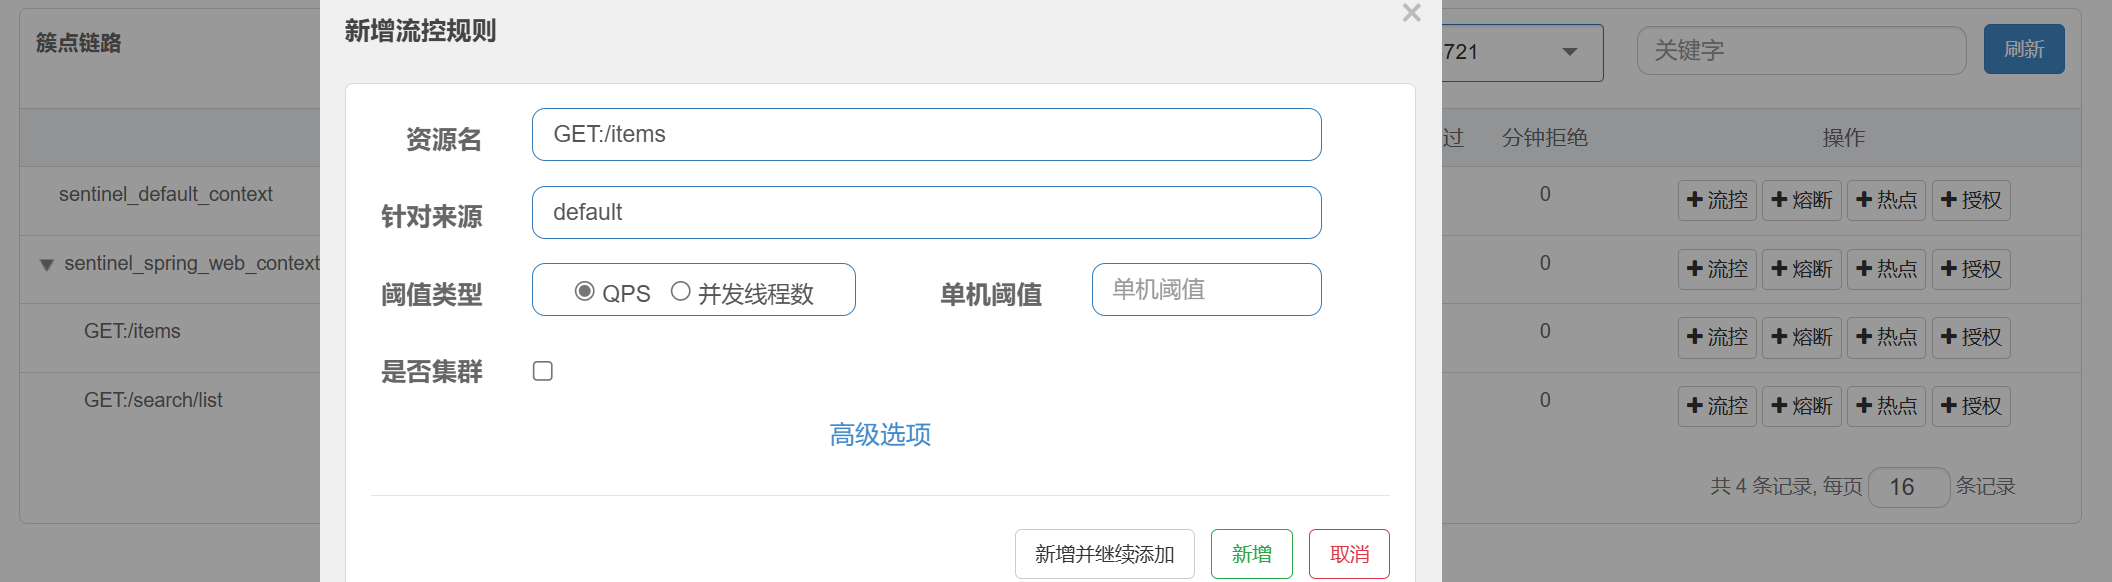
#### 限流:
|
||
|
||
|
||
|
||
直接在sentinel控制台->簇点链路->流控 里面设置QPS
|
||
|
||
|
||
|
||
#### 线程隔离
|
||
|
||
<img src="https://pic.bitday.top/i/2025/05/26/umzjz1-0.png" alt="image-20250526185301904" style="zoom: 67%;" />
|
||
|
||
阈值类型选 **并发线程数** ,代表这个接口所能用的线程数。
|
||
|
||
|
||
|
||
#### Fallback
|
||
|
||
触发限流或熔断后的请求不一定要直接报错,也可以返回一些默认数据或者友好提示,采用FallbackFactory,可以对远程调用的异常做处理。
|
||
|
||
业务场景:购物车服务需要同时**openFeign**调用服务B和商品服务,现在对商务服务做了线程隔离,在高并发的时候,会疯狂抛异常,现在做个fallback让它返回默认值。
|
||
|
||
<img src="https://pic.bitday.top/i/2025/05/26/yu026z-0.png" alt="image-20250526210626857" style="zoom:80%;" />
|
||
|
||
**步骤一**:在hm-api模块中给`ItemClient`定义降级处理类,实现`FallbackFactory`:
|
||
|
||
<img src="https://pic.bitday.top/i/2025/05/26/x2wpbf-0.png" alt="image-20250526200028905" style="zoom:80%;" />
|
||
|
||
```
|
||
public class ItemClientFallback implements FallbackFactory<ItemClient> {
|
||
@Override
|
||
public ItemClient create(Throwable cause) {
|
||
return new ItemClient() {
|
||
@Override
|
||
public List<ItemDTO> queryItemByIds(Collection<Long> ids) {
|
||
log.error("远程调用ItemClient#queryItemByIds方法出现异常,参数:{}", ids, cause);
|
||
// 查询购物车允许失败,查询失败,返回空集合
|
||
return CollUtils.emptyList();
|
||
}
|
||
|
||
@Override
|
||
public void deductStock(List<OrderDetailDTO> items) {
|
||
// 库存扣减业务需要触发事务回滚,查询失败,抛出异常
|
||
throw new BizIllegalException(cause);
|
||
}
|
||
};
|
||
}
|
||
}
|
||
```
|
||
|
||
|
||
|
||
**步骤二**:在`hm-api`模块中的`com.hmall.api.config.DefaultFeignConfig`类中将`ItemClientFallback`注册为一个`Bean`:
|
||
|
||
```java
|
||
@Bean
|
||
public ItemClientFallback itemClientFallback(){
|
||
return new ItemClientFallback();
|
||
}
|
||
```
|
||
|
||
**步骤三**:在`hm-api`模块中的`ItemClient`接口中使用`ItemClientFallbackFactory`:
|
||
|
||
```java
|
||
@FeignClient(value = "item-service",fallbackFactory = ItemClientFallback.class)
|
||
public interface ItemClient {
|
||
@GetMapping("/items")
|
||
List<ItemDTO> queryItemByIds(@RequestParam("ids") Collection<Long> ids);
|
||
}
|
||
```
|
||
|
||
重启后,再次测试
|
||
|
||
|
||
|
||
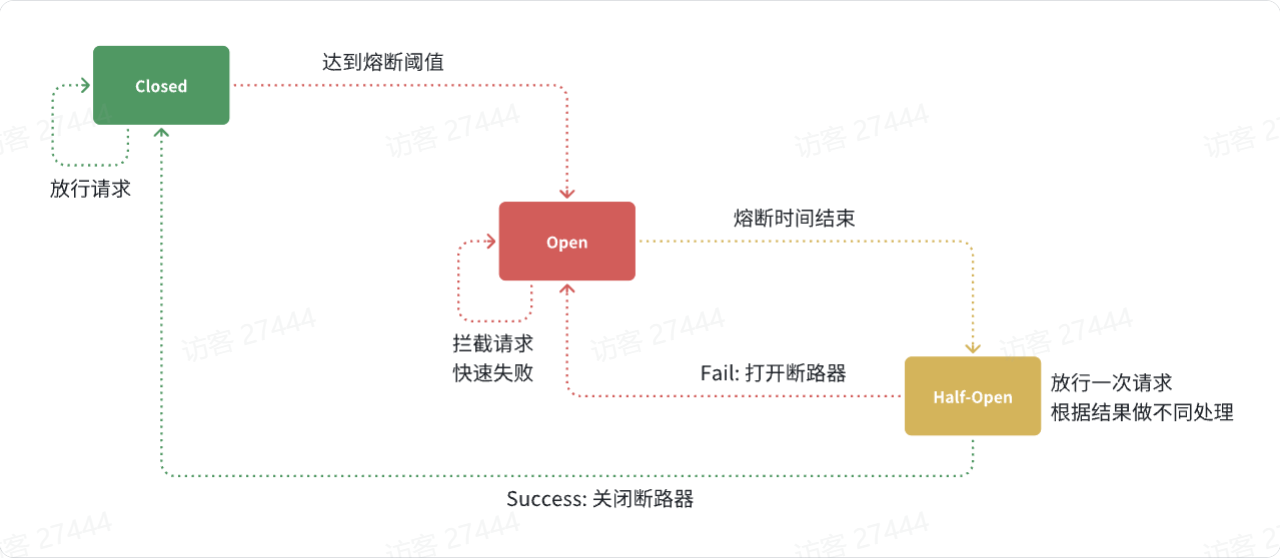
#### 熔断器
|
||
|
||
|
||
|
||
<img src="https://pic.bitday.top/i/2025/05/27/guf1mx-0.png" alt="image-20250527101856284" style="zoom:80%;" />
|
||
|
||
|
||
|
||
## 分布式事务
|
||
|
||
场景:订单服务依次调用了购物车服务和库存服务,它们各自操作不同的数据库。当清空购物车操作成功、库存扣减失败时,订单服务能捕获到异常,却无法通知已完成操作的购物车服务,导致数据不一致。虽然每个微服务内部都能保证本地事务的 ACID 特性,但跨服务调用**缺乏全局协调**,无法实现端到端的一致性。
|
||
|
||
<img src="https://pic.bitday.top/i/2025/05/27/hbf2ke-0.png" alt="image-20250527104713275" style="zoom:80%;" />
|
||
|
||
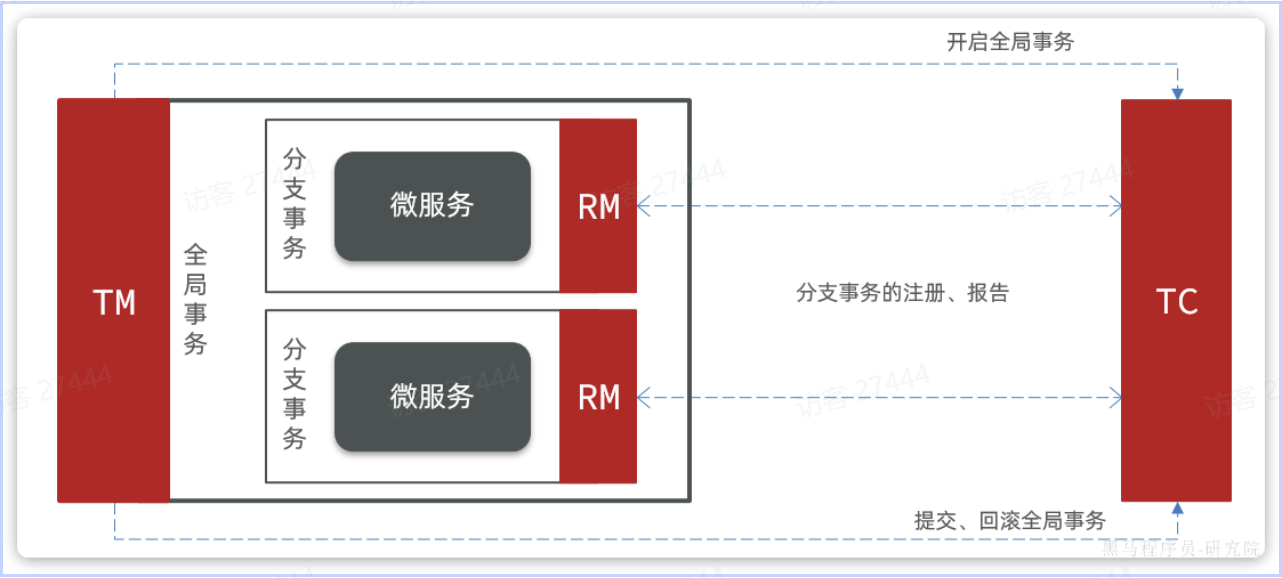
### Seeta
|
||
|
||
要解决这个问题,只需引入一个统一的**事务协调者**,负责跟每个分支通信,检测状态,并统一决定全局提交或回滚。
|
||
|
||
在 Seata 中,对应三大角色:
|
||
|
||
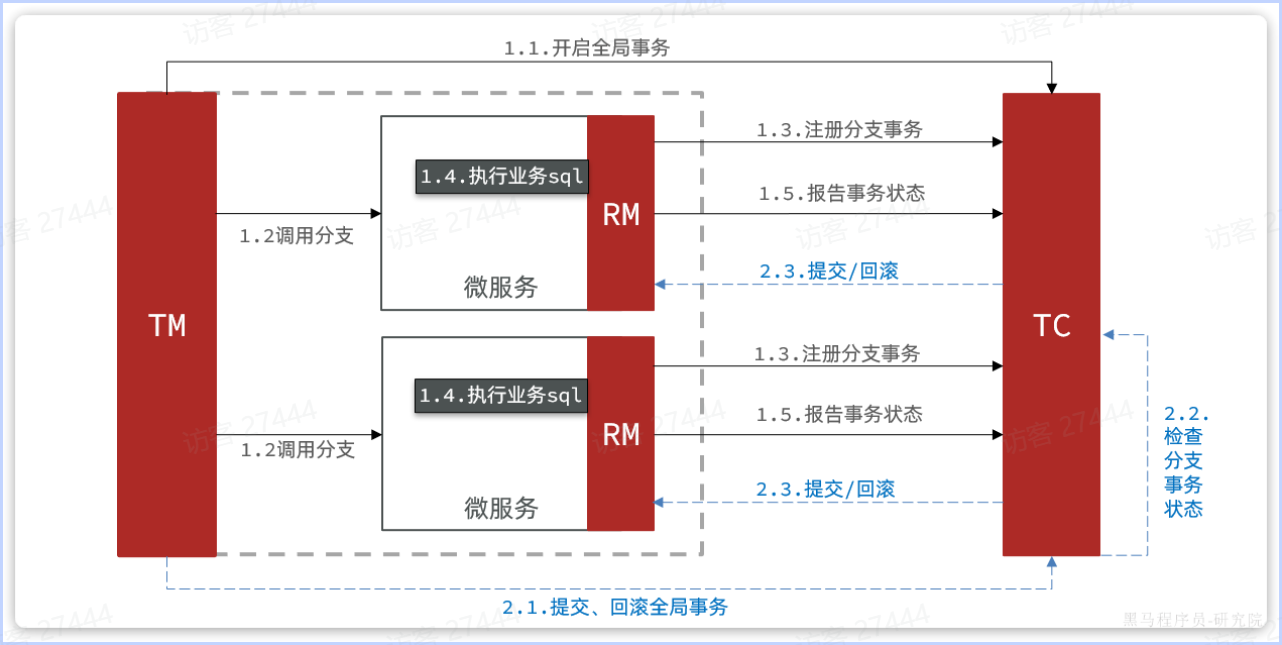
- **TC(Transaction Coordinator)事务协调者**
|
||
维护全局事务和各分支事务的状态,负责发起全局提交或回滚指令。
|
||
- **TM(Transaction Manager)事务管理器**
|
||
定义并启动全局事务,最后根据应用调用决定调用提交或回滚。
|
||
- **RM(Resource Manager)资源管理器**
|
||
嵌入到各微服务中,负责注册分支事务、上报执行结果,并在接到 TC 指令后执行本地提交或回滚。
|
||
|
||
|
||
|
||
其中,TM 和 RM 作为客户端依赖,**直接集成到业务服务里**;TC 则是一个**独立部署的微服务**,承担全局协调的职责。这样,无论有多少分支参与,都能保证“要么都成功、要么都回滚”的一致性。
|
||
|
||
|
||
|
||
### 部署TC服务
|
||
|
||
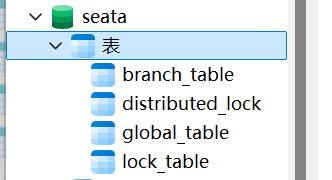
1)准备数据库表
|
||
|
||
seata-tc.sql 运行初始化脚本
|
||
|
||
|
||
|
||
2)准备配置文件
|
||
|
||
|
||
|
||
3)Docker部署
|
||
|
||
```yml
|
||
seeta-server:
|
||
image: seataio/seata-server:1.5.2
|
||
container_name: seata-server
|
||
restart: unless-stopped
|
||
depends_on:
|
||
- mysql
|
||
- nacos
|
||
environment:
|
||
# 指定 Seata 注册中心和配置中心地址
|
||
- SEATA_IP=192.168.0.107 # IDEA 可以访问到的宿主机 IP
|
||
- SEATA_SERVICE_PORT=17099
|
||
- SEATA_CONFIG_TYPE=file
|
||
# 可视情况再加:SEATA_NACOS_SERVER_ADDR=nacos:8848
|
||
networks:
|
||
- hmall-net
|
||
ports:
|
||
- "17099:7099" # TC 服务端口
|
||
- "8099:8099" # 服务管理端口(Console)
|
||
volumes:
|
||
- ./seata:/seata-server/resources
|
||
```
|
||
|
||
|
||
|
||
### 微服务集成Seata
|
||
|
||
1)引入依赖
|
||
|
||
```xml
|
||
<!--统一配置管理-->
|
||
<dependency>
|
||
<groupId>com.alibaba.cloud</groupId>
|
||
<artifactId>spring-cloud-starter-alibaba-nacos-config</artifactId>
|
||
</dependency>
|
||
<!--读取bootstrap文件-->
|
||
<dependency>
|
||
<groupId>org.springframework.cloud</groupId>
|
||
<artifactId>spring-cloud-starter-bootstrap</artifactId>
|
||
</dependency>
|
||
<!--seata-->
|
||
<dependency>
|
||
<groupId>com.alibaba.cloud</groupId>
|
||
<artifactId>spring-cloud-starter-alibaba-seata</artifactId>
|
||
</dependency>
|
||
```
|
||
|
||
2)在nacos上添加一个共享的seata配置,命名为`shared-seata.yaml`,你在bootstrap中引入该配置即可:
|
||
|
||
```yaml
|
||
seata:
|
||
registry: # TC服务注册中心的配置,微服务根据这些信息去注册中心获取tc服务地址
|
||
type: nacos # 注册中心类型 nacos
|
||
nacos:
|
||
server-addr: 192.168.0.107:8848 # 替换为自己的nacos地址
|
||
namespace: "" # namespace,默认为空
|
||
group: DEFAULT_GROUP # 分组,默认是DEFAULT_GROUP
|
||
application: seata-server # seata服务名称
|
||
username: nacos
|
||
password: nacos
|
||
tx-service-group: hmall # 事务组名称
|
||
service:
|
||
vgroup-mapping: # 事务组与tc集群的映射关系
|
||
hmall: "default"
|
||
```
|
||
|
||
这段配置是告诉你的微服务如何去「找到并使用」Seata 的 TC(Transaction Coordinator)服务,以便在本地发起、提交或回滚分布式事务。
|
||
|
||
|
||
|
||
### XA模式
|
||
|
||
|
||
|
||
`XA`模式的优点是什么?
|
||
|
||
- 事务的**强一致性**,满足ACID原则
|
||
- 常用数据库都支持,实现简单,并且没有代码侵入
|
||
|
||
`XA`模式的缺点是什么?
|
||
|
||
- 因为**一阶段需要锁定数据库资源,等待二阶段结束才释放**,性能较差
|
||
- 依赖关系型数据库实现事务
|
||
|
||
|
||
|
||
**实现方式**
|
||
|
||
1)在Nacos中的共享shared-seata.yaml配置文件中设置:
|
||
|
||
```yaml
|
||
seata:
|
||
data-source-proxy-mode: XA
|
||
```
|
||
|
||
2)利用`@GlobalTransactional`标记分布式事务的入口方法
|
||
|
||
```java
|
||
@GlobalTransactional
|
||
public Long createOrder(OrderFormDTO orderFormDTO) {
|
||
...
|
||
}
|
||
```
|
||
|
||
3)子事务中方法前添加`@Transactional` ,方便回滚
|
||
|
||
|
||
|
||
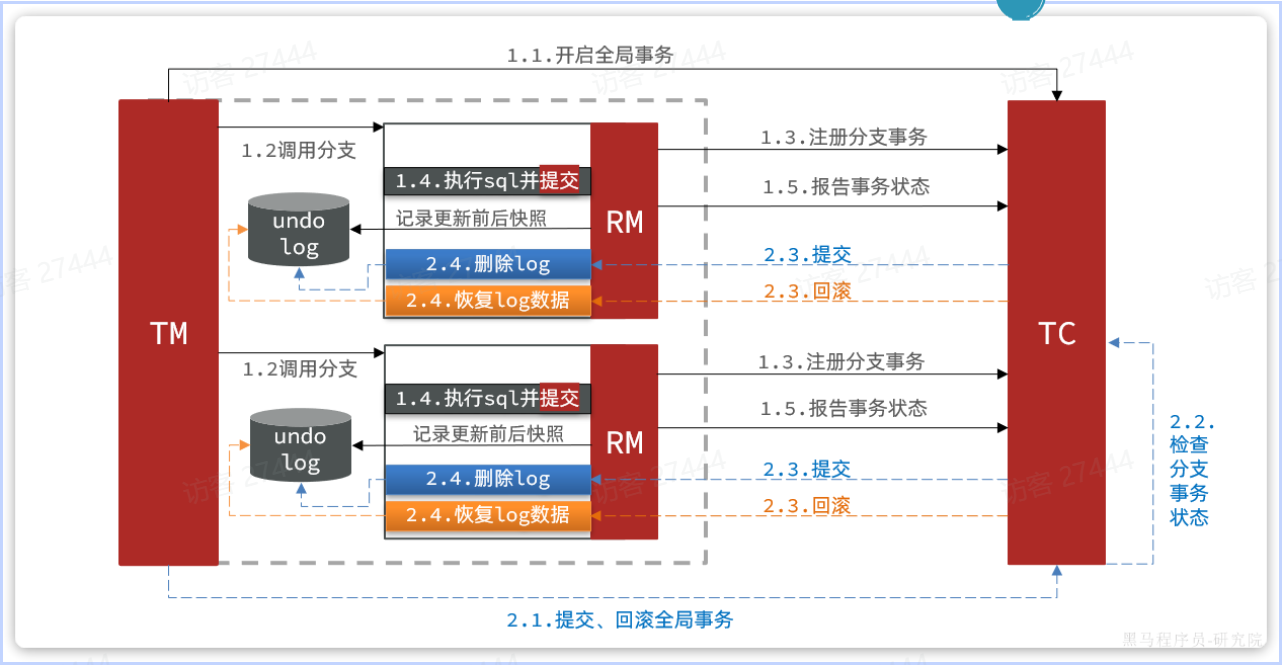
### AT模式
|
||
|
||
|
||
|
||
简述`AT`模式与`XA`模式最大的区别是什么?
|
||
|
||
- `XA`模式一阶段不提交事务,锁定资源;`AT`模式一阶段直接提交,不锁定资源。
|
||
- `XA`模式依赖数据库机制实现回滚;`AT`模式利用数据快照实现数据回滚。
|
||
- `XA`模式强一致;`AT`模式最终一致(存在短暂不一致)
|
||
|
||
|
||
|
||
实现方式:
|
||
|
||
1)为需要的微服务数据库中**创建undo_log表**
|
||
|
||
```mysql
|
||
-- for AT mode you must to init this sql for you business database. the seata server not need it.
|
||
CREATE TABLE IF NOT EXISTS `undo_log`
|
||
(
|
||
`branch_id` BIGINT NOT NULL COMMENT 'branch transaction id',
|
||
`xid` VARCHAR(128) NOT NULL COMMENT 'global transaction id',
|
||
`context` VARCHAR(128) NOT NULL COMMENT 'undo_log context,such as serialization',
|
||
`rollback_info` LONGBLOB NOT NULL COMMENT 'rollback info',
|
||
`log_status` INT(11) NOT NULL COMMENT '0:normal status,1:defense status',
|
||
`log_created` DATETIME(6) NOT NULL COMMENT 'create datetime',
|
||
`log_modified` DATETIME(6) NOT NULL COMMENT 'modify datetime',
|
||
UNIQUE KEY `ux_undo_log` (`xid`, `branch_id`)
|
||
) ENGINE = InnoDB
|
||
AUTO_INCREMENT = 1
|
||
DEFAULT CHARSET = utf8mb4 COMMENT ='AT transaction mode undo table';
|
||
|
||
```
|
||
|
||
2)微服务的配置中设置(其实不设置,默认也是AT模式)
|
||
|
||
```
|
||
seata:
|
||
data-source-proxy-mode: AT
|
||
```
|
||
|