840 lines
26 KiB
Markdown
840 lines
26 KiB
Markdown
# 微服务
|
||
|
||
## 认识微服务
|
||
|
||
微服务架构,首先是服务化,就是将单体架构中的功能模块从单体应用中拆分出来,独立部署为多个服务。
|
||
|
||
<img src="https://pic.bitday.top/i/2025/05/20/iyyuzk-0.png" alt="image-20250520114708790" style="zoom:67%;" />
|
||
|
||
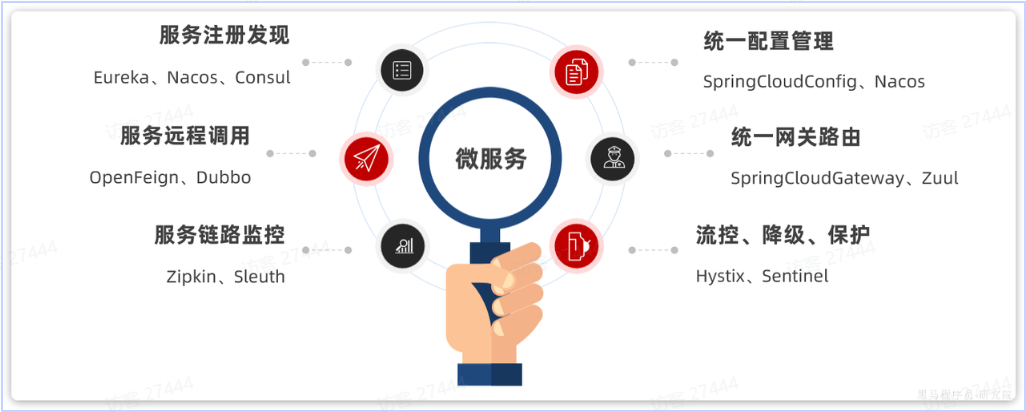
**SpringCloud**
|
||
|
||
|
||
|
||
使用Spring Cloud 2021.0.x以及Spring Boot 2.7.x版本(需要对应)。
|
||
|
||
<img src="https://pic.bitday.top/i/2025/05/20/knttz4-0.png" alt="image-20250520124938379" style="zoom:80%;" />
|
||
|
||
<img src="https://pic.bitday.top/i/2025/05/20/knvz3s-0.png" alt="image-20250520124948604" style="zoom:80%;" />
|
||
|
||
在父pom中的`<dependencyManagement>`锁定版本,使得后续你在子模块里引用 Spring Cloud 或 Spring Cloud Alibaba 的各个组件时,不需要再写 `<version>`,Maven 会统一采用你在父 POM 中指定的版本。
|
||
|
||
|
||
|
||
## 微服务拆分
|
||
|
||
微服务拆分时:
|
||
|
||
- **高内聚**:每个微服务的职责要尽量单一,包含的业务相互关联度高、完整度高。
|
||
- **低耦合**:每个微服务的功能要相对独立,尽量减少对其它微服务的依赖,或者依赖接口的稳定性要强。
|
||
|
||
<img src="https://pic.bitday.top/i/2025/05/20/m06nzx-0.png" alt="image-20250520133100419" style="zoom:67%;" />
|
||
|
||
**一般微服务项目有两种不同的工程结构:**
|
||
|
||
- [ ] 完全解耦:每一个微服务都创建为一个**独立的工程**,甚至可以使用不同的开发语言来开发,项目完全解耦。
|
||
- 优点:服务之间耦合度低
|
||
- 缺点:每个项目都有自己的独立仓库,管理起来比较麻烦
|
||
- [x] **Maven聚合**:整个项目为一个Project,然后每个微服务是其中的**一个Module**
|
||
- 优点:项目代码集中,管理和运维方便
|
||
- 缺点:服务之间耦合,编译时间较长
|
||
|
||
,每个模块都要有:pom.xml application.yml controller service mapper pojo 启动类
|
||
|
||
|
||
|
||
IDEA配置小技巧:
|
||
|
||
1.自动导包
|
||
|
||

|
||
|
||
2.配置service窗口,以显示多个微服务启动类
|
||
|
||
<img src="https://pic.bitday.top/i/2025/05/21/pf7h7n-0.png" alt="image-20250521153717289" style="zoom: 80%;" />
|
||
|
||
3.如何在idea中虚拟多服务负载均衡?
|
||
|
||
<img src="https://pic.bitday.top/i/2025/05/21/tzm5xp-0.png" alt="image-20250521181337779" style="zoom:80%;" />
|
||
|
||
<img src="https://pic.bitday.top/i/2025/05/21/u0vvwe-0.png" alt="image-20250521181552335" style="zoom:80%;" />
|
||
|
||
More options->Add VM options -> **-Dserver.port=xxxx**
|
||
|
||
这边设置不同的端口号!
|
||
|
||
|
||
|
||
## 服务注册和发现
|
||
|
||
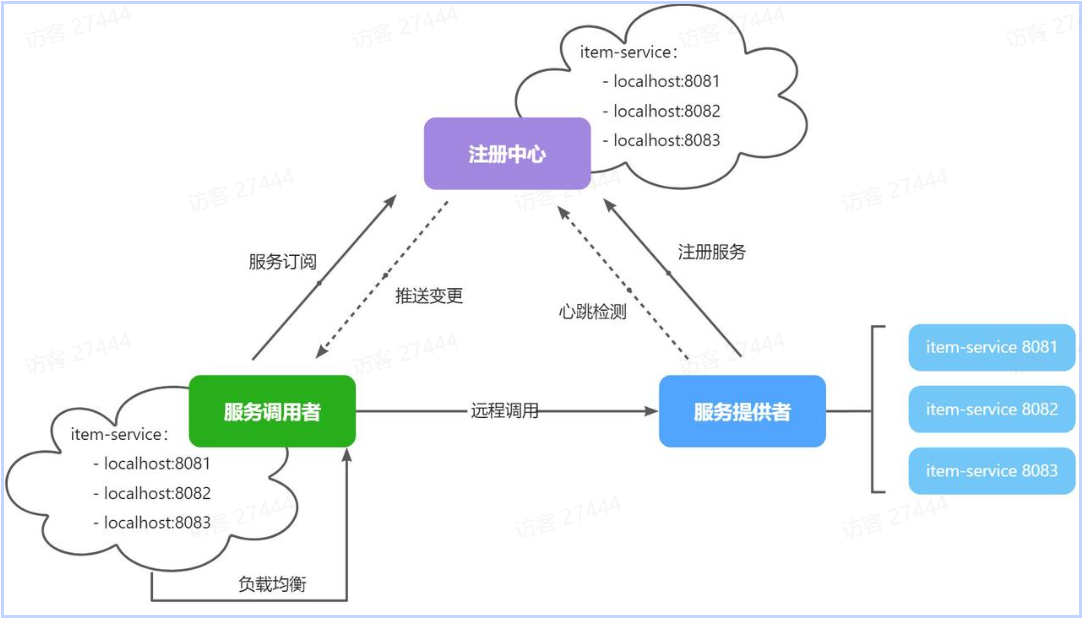
注册中心、服务提供者、服务消费者三者间关系如下:
|
||
|
||
|
||
|
||
流程如下:
|
||
|
||
- 服务启动时就会**注册自己的服务信息**(服务名、IP、端口)到注册中心
|
||
- 调用者可以从注册中心订阅想要的服务,获取服务对应的实例列表(1个服务可能多实例部署)
|
||
- 调用者自己对实例列表**负载均衡,挑选一个实例**
|
||
- 调用者向该实例发起远程调用
|
||
|
||
当服务提供者的实例宕机或者启动新实例时,调用者如何得知呢?
|
||
|
||
- 服务提供者会**定期**向注册中心发送请求,报告自己的健康状态(**心跳请求**)
|
||
- 当注册中心长时间收不到提供者的心跳时,会认为该实例宕机,将其**从服务的实例列表中剔除**
|
||
- 当服务有新实例启动时,会发送注册服务请求,其信息会被记录在注册中心的服务实例列表
|
||
- 当注册中心服务列表变更时,会**主动通知微服务**,更新本地服务列表(防止服务调用者继续调用挂逼的服务)
|
||
|
||
### Nacos部署:
|
||
|
||
1.依赖mysql中的一个数据库 ,可由nacos.sql初始化
|
||
|
||
2.需要.env文件,配置和数据库的连接信息:
|
||
|
||
```text
|
||
PREFER_HOST_MODE=hostname
|
||
MODE=standalone
|
||
SPRING_DATASOURCE_PLATFORM=mysql
|
||
MYSQL_SERVICE_HOST=124.71.159.***
|
||
MYSQL_SERVICE_DB_NAME=nacos
|
||
MYSQL_SERVICE_PORT=3307
|
||
MYSQL_SERVICE_USER=root
|
||
MYSQL_SERVICE_PASSWORD=*******
|
||
MYSQL_SERVICE_DB_PARAM=characterEncoding=utf8&connectTimeout=1000&socketTimeout=3000&autoReconnect=true&useSSL=false&allowPublicKeyRetrieval=true&serverTimezone=Asia/Shanghai
|
||
```
|
||
|
||
3.docker部署:
|
||
|
||
```yml
|
||
nacos:
|
||
image: nacos/nacos-server:v2.1.0
|
||
container_name: nacos-server
|
||
restart: unless-stopped
|
||
env_file:
|
||
- ./nacos/custom.env # 自定义环境变量文件
|
||
ports:
|
||
- "8848:8848" # Nacos 控制台端口
|
||
- "9848:9848" # RPC 通信端口 (TCP 长连接/心跳)
|
||
- "9849:9849" # gRPC 通信端口
|
||
networks:
|
||
- hm-net
|
||
depends_on:
|
||
- mysql
|
||
volumes:
|
||
- ./nacos/init.d:/docker-entrypoint-init.d # 如果需要额外初始化脚本,可选
|
||
```
|
||
|
||
启动完成后,访问地址:http://ip:8848/nacos/
|
||
|
||
初始账号密码都是nacos
|
||
|
||
|
||
|
||
### 服务注册
|
||
|
||
1.在`item-service`的`pom.xml`中添加依赖:
|
||
|
||
```xml
|
||
<!--nacos 服务注册发现-->
|
||
<dependency>
|
||
<groupId>com.alibaba.cloud</groupId>
|
||
<artifactId>spring-cloud-starter-alibaba-nacos-discovery</artifactId>
|
||
</dependency>
|
||
```
|
||
|
||
2.配置Nacos
|
||
|
||
在`item-service`的`application.yml`中添加nacos地址配置:
|
||
|
||
```yml
|
||
spring:
|
||
application:
|
||
name: item-service #服务名
|
||
cloud:
|
||
nacos:
|
||
server-addr: 124.71.159.***:8848 # nacos地址
|
||
```
|
||
|
||
注意,服务注册默认连9848端口!云服务需要开启该端口!
|
||
|
||

|
||
|
||
配置里的item-service就是服务名!
|
||
|
||
|
||
|
||
### 服务发现
|
||
|
||
前两步同服务注册
|
||
|
||
3.通过DiscoveryClient发现服务实例列表,然后通过负载均衡算法,选择一个实例去调用
|
||
|
||
discoveryClient发现服务 + restTemplate远程调用
|
||
|
||
```java
|
||
@Service
|
||
public class CartServiceImpl {
|
||
|
||
@Autowired
|
||
private DiscoveryClient discoveryClient; // 注入 DiscoveryClient
|
||
|
||
@Autowired
|
||
private RestTemplate restTemplate; // 用于发 HTTP 请求
|
||
|
||
private void handleCartItems(List<CartVO> vos) {
|
||
// 1. 获取商品 id 列表
|
||
Set<Long> itemIds = vos.stream()
|
||
.map(CartVO::getItemId)
|
||
.collect(Collectors.toSet());
|
||
|
||
// 2.1. 发现 item-service 服务的实例列表
|
||
List<ServiceInstance> instances = discoveryClient.getInstances("item-service");
|
||
|
||
// 2.2. 负载均衡:随机挑选一个实例
|
||
ServiceInstance instance = instances.get(
|
||
RandomUtil.randomInt(instances.size())
|
||
);
|
||
|
||
// 2.3. 发送请求,查询商品详情
|
||
String url = instance.getUri().toString() + "/items?ids={ids}";
|
||
ResponseEntity<List<ItemDTO>> response = restTemplate.exchange(
|
||
url,
|
||
HttpMethod.GET,
|
||
null,
|
||
new ParameterizedTypeReference<List<ItemDTO>>() {},
|
||
String.join(",", itemIds)
|
||
);
|
||
|
||
// 2.4. 处理结果
|
||
if (response.getStatusCode().is2xxSuccessful()) {
|
||
List<ItemDTO> items = response.getBody();
|
||
// … 后续处理 …
|
||
} else {
|
||
throw new RuntimeException("查询商品失败: " + response.getStatusCode());
|
||
}
|
||
}
|
||
}
|
||
```
|
||
|
||
|
||
|
||
### OpenFeign
|
||
|
||
让**远程调用像本地方法调用一样简单**
|
||
|
||
#### 快速入门
|
||
|
||
1.引入依赖
|
||
|
||
```xml
|
||
<!--openFeign-->
|
||
<dependency>
|
||
<groupId>org.springframework.cloud</groupId>
|
||
<artifactId>spring-cloud-starter-openfeign</artifactId>
|
||
</dependency>
|
||
<!--负载均衡器-->
|
||
<dependency>
|
||
<groupId>org.springframework.cloud</groupId>
|
||
<artifactId>spring-cloud-starter-loadbalancer</artifactId>
|
||
</dependency>
|
||
```
|
||
|
||
2.启用OpenFeign
|
||
|
||
在服务调用者`cart-service`的`CartApplication`启动类上添加注解:
|
||
|
||
`@EnableFeignClients`
|
||
|
||
3.编写OpenFeign客户端
|
||
|
||
在`cart-service`中,定义一个新的接口,编写Feign客户端:
|
||
|
||
```java
|
||
@FeignClient("item-service")
|
||
public interface ItemClient {
|
||
|
||
@GetMapping("/items")
|
||
List<ItemDTO> queryItemByIds(@RequestParam("ids") Collection<Long> ids);
|
||
}
|
||
```
|
||
|
||
`queryItemByIds`这个方法名可以随便取,但`@GetMapping("/items")` 和 `@RequestParam("ids")` 要跟 item-service 服务中实际暴露的接口路径和参数名保持一致(直接参考服务提供者的Controller层对应方法对应即可);
|
||
|
||
一个客户端对应一个服务,可以在ItemClient里面写多个方法。
|
||
|
||
4.使用
|
||
|
||
```java
|
||
List<ItemDTO> items = itemClient.queryItemByIds(Arrays.asList(1L, 2L, 3L));
|
||
```
|
||
|
||
Feign 会帮你把 `ids=[1,2,3]` 序列化成一个 HTTP GET 请求,URL 形如:
|
||
|
||
```text
|
||
GET http://item-service/items?ids=1&ids=2&ids=3
|
||
```
|
||
|
||
|
||
|
||
#### 连接池
|
||
|
||
Feign底层发起http请求,依赖于其它的框架。其底层支持的http客户端实现包括:
|
||
|
||
- HttpURLConnection:默认实现,不支持连接池
|
||
- Apache HttpClient :支持连接池
|
||
- OKHttp:支持连接池
|
||
|
||
这里用带有连接池的HttpClient 替换默认的
|
||
|
||
1.引入依赖
|
||
|
||
```xml
|
||
<dependency>
|
||
<groupId>io.github.openfeign</groupId>
|
||
<artifactId>feign-httpclient</artifactId>
|
||
</dependency>
|
||
```
|
||
|
||
2.开启连接池
|
||
|
||
```yml
|
||
feign:
|
||
httpclient:
|
||
enabled: true # 使用 Apache HttpClient(默认关闭)
|
||
```
|
||
|
||
重启服务,连接池就生效了。
|
||
|
||
|
||
|
||
#### 最佳实践
|
||
|
||
如果拆分了交易微服务(`trade-service`),它也需要远程调用`item-service`中的根据id批量查询商品功能。这个需求与`cart-service`中是一样的。那么会再次定义`ItemClient`接口导致重复编程。
|
||
|
||
- 思路1:抽取到微服务之外的公共module,需要调用client就引用该module的坐标。
|
||
|
||
<img src="https://pic.bitday.top/i/2025/05/22/jv1r9u-0.png" alt="image-20250522120106182" style="zoom:80%;" />
|
||
|
||
- 思路2:每个微服务自己抽取一个module,比如item-service,将需要共享的domain实体放在item-dto模块,需要供其他微服务调用的cilent放在item-api模块,自己维护自己的,然后其他微服务引入maven坐标直接使用。
|
||
|
||
<img src="https://pic.bitday.top/i/2025/05/22/j5mb6l-0.png" alt="image-20250522115834339" style="zoom:80%;" />
|
||
|
||
大型项目思路2更清晰、更合理。但这里选择思路1,方便起见。
|
||
|
||
|
||
|
||
**拆分之后重启报错:**`Parameter 0 of constructor in com.hmall.cart.service.impl.CartServiceImpl required a bean of type 'com.hmall.api.client.ItemClient' that could not be found.`
|
||
|
||
是因为:Feign Client 没被扫描到,Spring Boot 默认只会在主应用类所在包及其子包里扫描 `@FeignClient`。
|
||
|
||
需要额外设置basePackages
|
||
|
||
```java
|
||
package com.hmall.cart;
|
||
@MapperScan("com.hmall.cart.mapper")
|
||
@EnableFeignClients(basePackages= "com.hmall.api.client")
|
||
@SpringBootApplication
|
||
public class CartApplication {
|
||
public static void main(String[] args) {
|
||
|
||
SpringApplication.run(CartApplication.class, args);
|
||
}
|
||
}
|
||
```
|
||
|
||
|
||
|
||
## 网关
|
||
|
||
在微服务拆分后的联调过程中,经常会遇到以下问题:
|
||
|
||
- 不同业务数据分布在各自微服务,需要维护**多套地址和端口**,调用繁琐且易错;
|
||
- 前端无法直接访问注册中心(如 Nacos),无法实时获取服务列表,导致接口切换不灵活。
|
||
|
||
此外,单体架构下只需完成一次**登录与身份校验**,所有业务模块即可共享用户信息;但在微服务架构中:
|
||
|
||
- 每个微服务是否都要重复实现登录校验和用户信息获取?
|
||
- 服务间调用时,如何安全、可靠地传递用户身份?
|
||
|
||
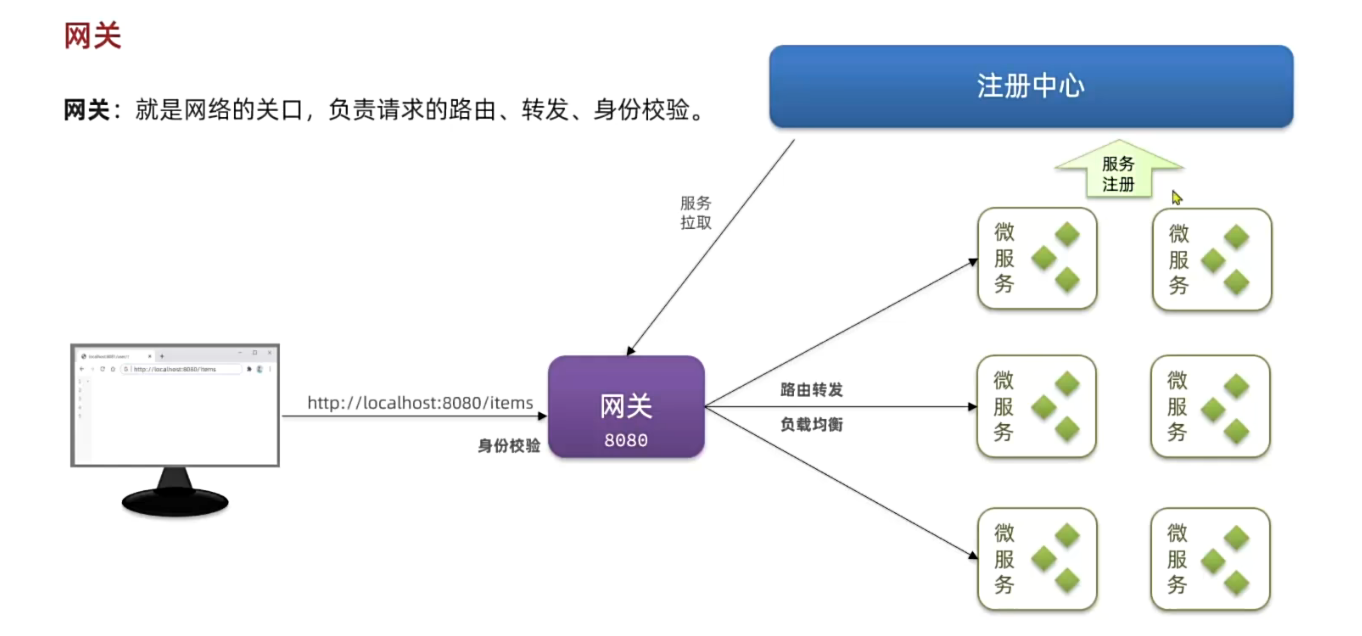
通过引入 **API 网关**,我们可以在**统一入口处解决**以上问题:它提供动态路由与负载均衡,前端**只需调用一个地址**;它与注册中心集成,实时路由调整;它还在网关层集中完成登录鉴权和用户信息透传,下游服务无需重复实现安全逻辑。
|
||
|
||
|
||
|
||
### 快速入门
|
||
|
||
网关本身也是一个独立的微服务,因此也需要创建一个模块开发功能。大概步骤如下:
|
||
|
||
- 创建网关微服务
|
||
- 引入SpringCloudGateway、NacosDiscovery依赖
|
||
- 编写启动类
|
||
- 配置网关路由
|
||
|
||
1.依赖引入:
|
||
|
||
```xml
|
||
<!-- 网关 -->
|
||
<dependency>
|
||
<groupId>org.springframework.cloud</groupId>
|
||
<artifactId>spring-cloud-starter-gateway</artifactId>
|
||
</dependency>
|
||
|
||
<!-- Nacos Discovery -->
|
||
<dependency>
|
||
<groupId>com.alibaba.cloud</groupId>
|
||
<artifactId>spring-cloud-starter-alibaba-nacos-discovery</artifactId>
|
||
</dependency>
|
||
|
||
<!-- 负载均衡 -->
|
||
<dependency>
|
||
<groupId>org.springframework.cloud</groupId>
|
||
<artifactId>spring-cloud-starter-loadbalancer</artifactId>
|
||
</dependency>
|
||
```
|
||
|
||
2.配置网关路由
|
||
|
||
**`id`**:给这条路由起个唯一的标识,方便你在日志、监控里看是哪个规则。(最好和服务名一致)
|
||
|
||
**`uri: lb://xxx`**:`xxx` 必须和服务注册时的名字一模一样(比如 `Item-service` 或全大写 `ITEM-SERVICE`,取决于你在微服务启动时 `spring.application.name` 配置)
|
||
|
||
```yml
|
||
server:
|
||
port: 8080
|
||
spring:
|
||
application:
|
||
name: gateway
|
||
cloud:
|
||
nacos:
|
||
server-addr: 192.168.150.101:8848
|
||
gateway:
|
||
routes:
|
||
- id: item # 路由规则id,自定义,唯一
|
||
uri: lb://item-service # 路由的目标服务,lb代表负载均衡,会从注册中心拉取服务列表
|
||
predicates: # 路由断言,判断当前请求是否符合当前规则,符合则路由到目标服务
|
||
- Path=/items/**,/search/** # 支持多个路径模式,用逗号隔开
|
||
- id: cart
|
||
uri: lb://cart-service
|
||
predicates:
|
||
- Path=/carts/**
|
||
- id: user
|
||
uri: lb://user-service
|
||
predicates:
|
||
- Path=/users/**,/addresses/**
|
||
- id: trade
|
||
uri: lb://trade-service
|
||
predicates:
|
||
- Path=/orders/**
|
||
- id: pay
|
||
uri: lb://pay-service
|
||
predicates:
|
||
- Path=/pay-orders/**
|
||
|
||
```
|
||
|
||
`predicates`:路由断言,其实就是匹配条件
|
||
|
||
| After | 是某个时间点后的请求 | - After=2037-01-20T17:42:47.789-07:00[America/Denver] |
|
||
| ------ | ------------------------ | ----------------------------------------------------- |
|
||
| Before | 是某个时间点之前的请求 | - Before=2031-04-13T15:14:47.433+08:00[Asia/Shanghai] |
|
||
| Path | 请求路径必须符合指定规则 | - Path=/red/{segment},/blue/** |
|
||
|
||
|
||
|
||
**Ant风格路径**
|
||
|
||
用来灵活地匹配文件或请求路径:
|
||
|
||
`?`:匹配单个字符(除了 `/`)。
|
||
|
||
- 例如,`/user/??/profile` 能匹配 `/user/ab/profile`,但不能匹配 `/user/a/profile` 或 `/user/abc/profile`。
|
||
|
||
`*`:匹配任意数量的字符(零 个或 多个),但不跨越路径分隔符 `/`。
|
||
|
||
- 例如,`/images/*.png` 能匹配 `/images/a.png`、`/images/logo.png`,却不匹配 `/images/icons/logo.png`。
|
||
|
||
`**`:匹配任意层级的路径(可以跨越多个 `/`)。
|
||
|
||
- 例如,`/static/**` 能匹配 `/static/`、`/static/css/style.css`、`/static/js/lib/foo.js`,甚至 `/static/a/b/c/d`。
|
||
|
||
`AntPathMatcher` 是 Spring Framework 提供的一个工具类,用来对“Ant 风格”路径模式做匹配
|
||
|
||
```java
|
||
@Component
|
||
@ConfigurationProperties(prefix = "auth")
|
||
public class AuthProperties {
|
||
private List<String> excludePaths;
|
||
// getter + setter
|
||
}
|
||
|
||
@Component
|
||
public class AuthInterceptor implements HandlerInterceptor {
|
||
private final AntPathMatcher pathMatcher = new AntPathMatcher();
|
||
private final List<String> exclude;
|
||
|
||
public AuthInterceptor(AuthProperties props) {
|
||
this.exclude = props.getExcludePaths();
|
||
}
|
||
|
||
@Override
|
||
public boolean preHandle(HttpServletRequest req,
|
||
HttpServletResponse res,
|
||
Object handler) {
|
||
String path = req.getRequestURI(); // e.g. "/search/books/123"
|
||
|
||
// 检查是否匹配任何一个“放行”模式
|
||
for (String pattern : exclude) {
|
||
if (pathMatcher.match(pattern, path)) {
|
||
return true; // 放行,不做 auth
|
||
}
|
||
}
|
||
|
||
// 否则执行认证逻辑
|
||
// ...
|
||
return false;
|
||
}
|
||
}
|
||
```
|
||
|
||
当然
|
||
|
||
```yaml
|
||
predicates:
|
||
- Path=/users/**,/addresses/**
|
||
```
|
||
|
||
这里不需要手写JAVA逻辑进行路径匹配,因为Gateway自动实现了。但是后面自定义Gateway过滤器的时候就需要`AntPathMatcher`了!
|
||
|
||
|
||
|
||
### 登录校验
|
||
|
||
|
||
|
||
|
||
|
||
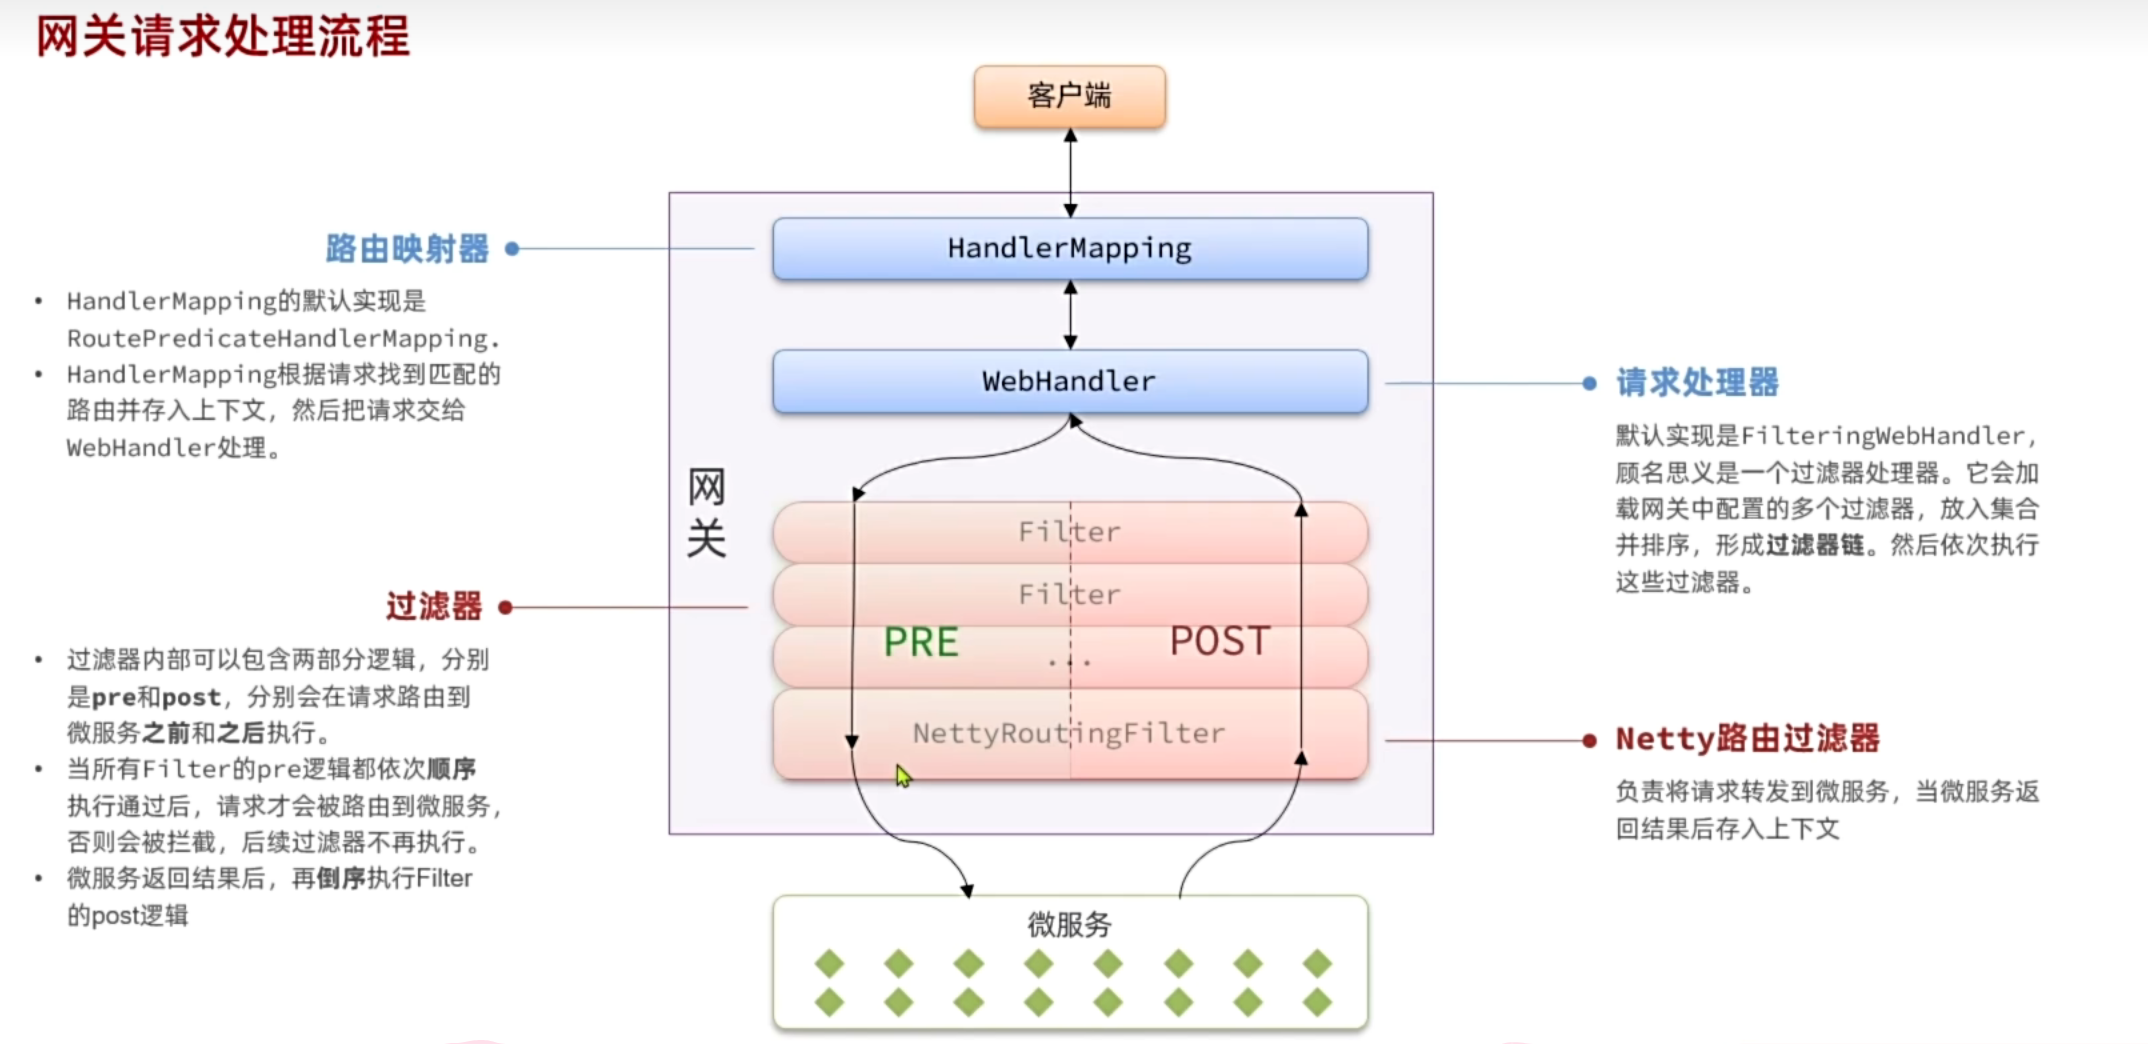
我们需要实现一个网关过滤器,有两种可选:
|
||
|
||
- [ ] **`GatewayFilter`**:路由过滤器,作用范围比较灵活,可以是任意指定的路由`Route`.
|
||
- [x] **`GlobalFilter`**:全局过滤器,作用范围是所有路由,不可配置。
|
||
|
||
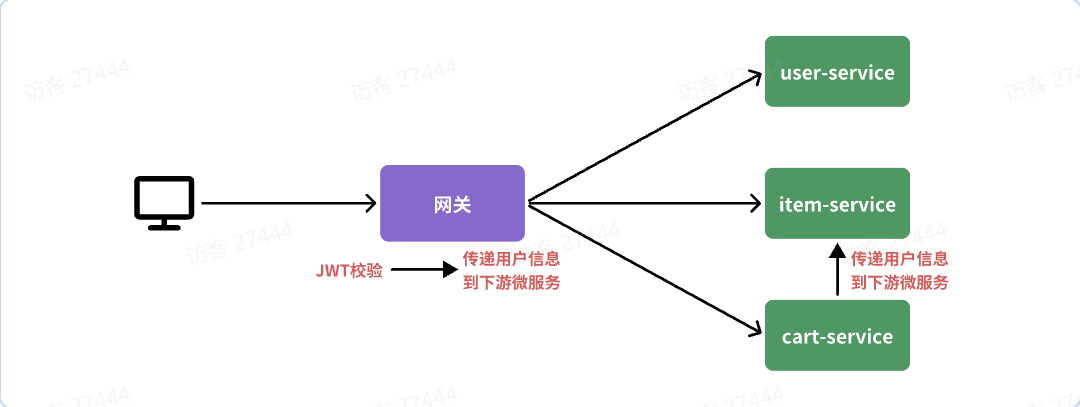
网关需要实现两个功能:1.JWT**校验** 2.将用户信息**传递**给微服务
|
||
|
||
#### 网关校验+存用户信息
|
||
|
||
```java
|
||
@Component
|
||
@RequiredArgsConstructor
|
||
@EnableConfigurationProperties(AuthProperties.class)
|
||
public class AuthGlobalFilter implements GlobalFilter, Ordered {
|
||
|
||
private final JwtTool jwtTool;
|
||
|
||
private final AuthProperties authProperties;
|
||
|
||
private final AntPathMatcher antPathMatcher = new AntPathMatcher();
|
||
|
||
@Override
|
||
public Mono<Void> filter(ServerWebExchange exchange, GatewayFilterChain chain) {
|
||
// 1.获取Request
|
||
ServerHttpRequest request = exchange.getRequest();
|
||
// 2.判断是否不需要拦截
|
||
if(isExclude(request.getPath().toString())){
|
||
// 无需拦截,直接放行
|
||
return chain.filter(exchange);
|
||
}
|
||
// 3.获取请求头中的token
|
||
String token = null;
|
||
List<String> headers = request.getHeaders().get("authorization");
|
||
if (!CollUtils.isEmpty(headers)) {
|
||
token = headers.get(0);
|
||
}
|
||
// 4.校验并解析token
|
||
Long userId = null;
|
||
try {
|
||
userId = jwtTool.parseToken(token);
|
||
} catch (UnauthorizedException e) {
|
||
// 如果无效,拦截
|
||
ServerHttpResponse response = exchange.getResponse();
|
||
response.setRawStatusCode(401);
|
||
return response.setComplete();
|
||
}
|
||
|
||
// 5.如果有效,传递用户信息
|
||
String userInfo = userId.toString();
|
||
ServerWebExchange modifiedExchange = exchange.mutate()
|
||
.request(builder -> builder.header("user-info", userInfo))
|
||
.build();
|
||
// 6.放行
|
||
return chain.filter(modifiedExchange);
|
||
}
|
||
|
||
private boolean isExclude(String antPath) {
|
||
for (String pathPattern : authProperties.getExcludePaths()) {
|
||
if(antPathMatcher.match(pathPattern, antPath)){
|
||
return true;
|
||
}
|
||
}
|
||
return false;
|
||
}
|
||
|
||
@Override
|
||
public int getOrder() {
|
||
return 0;
|
||
}
|
||
}
|
||
```
|
||
|
||
- 实现`Ordered`接口中的 `getOrder` 方法,数字越小过滤器执行优先级越高。
|
||
- `exchange` 可以获得上下文信息。
|
||
|
||
|
||
|
||
#### 拦截器获取用户
|
||
|
||
在Common模块中设置:
|
||
|
||
只负责保存 `userinfo` 到 `UserContext` ,不负责拦截,因为拦截在前面的过滤器做了。
|
||
|
||
```java
|
||
public class UserInfoInterceptor implements HandlerInterceptor {
|
||
@Override
|
||
public boolean preHandle(HttpServletRequest request, HttpServletResponse response, Object handler) throws Exception {
|
||
// 1.获取请求头中的用户信息
|
||
String userInfo = request.getHeader("user-info");
|
||
// 2.判断是否为空
|
||
if (StrUtil.isNotBlank(userInfo)) {
|
||
// 不为空,保存到ThreadLocal
|
||
UserContext.setUser(Long.valueOf(userInfo));
|
||
}
|
||
// 3.放行
|
||
return true;
|
||
}
|
||
|
||
@Override
|
||
public void afterCompletion(HttpServletRequest request, HttpServletResponse response, Object handler, Exception ex) throws Exception {
|
||
// 移除用户
|
||
UserContext.removeUser();
|
||
}
|
||
}
|
||
```
|
||
|
||
配置类:
|
||
|
||
```java
|
||
@Configuration
|
||
@ConditionalOnClass(DispatcherServlet.class)
|
||
public class MvcConfig implements WebMvcConfigurer {
|
||
@Override
|
||
public void addInterceptors(InterceptorRegistry registry) {
|
||
registry.addInterceptor(new UserInfoInterceptor());
|
||
}
|
||
}
|
||
```
|
||
|
||
注意:Spring Boot 只会从主启动类所在的包(及其子包)去扫描组件。 `common` 包跟 `item`、`cart` 等微服务模块是平级的,无法被扫描到。解决方法:
|
||
|
||
1.在每个微服务的启动类上添加包扫描
|
||
|
||
```java
|
||
@SpringBootApplication(
|
||
scanBasePackages = {"com.hmall.item","com.hmall.common"}
|
||
)
|
||
```
|
||
|
||
主包以及common包
|
||
|
||
2.在主应用的启动类上用 `@Import`:
|
||
|
||
```java
|
||
@SpringBootApplication
|
||
@Import(com.hmall.common.interceptors.MvcConfig.class)
|
||
public class Application { … }
|
||
```
|
||
|
||
**3.前两种方法的问题在于每个微服务模块中都需要写common的引入**
|
||
|
||
因此可以把`common` 模块做成 Spring Boot **自动配置**
|
||
|
||
1)在`common/src/main/resources/META-INF/spring.factories` 里声明:
|
||
|
||
```text
|
||
org.springframework.boot.autoconfigure.EnableAutoConfiguration=\
|
||
com.hmall.common.config.MvcConfig
|
||
```
|
||
|
||
2)在 `common` 模块里给 `MvcConfig` 加上
|
||
|
||
```java
|
||
@Configuration
|
||
@ConditionalOnClass(DispatcherServlet.class) //网关不生效 spring服务生效
|
||
public class MvcConfig { … }
|
||
```
|
||
|
||
3)然后在任何微服务的 `pom.xml`里只要依赖了这个 common jar,就会自动加载拦截器配置,根本不需要改服务里的 `@SpringBootApplication`。
|
||
|
||
|
||
|
||
#### OpenFeign传递用户
|
||
|
||
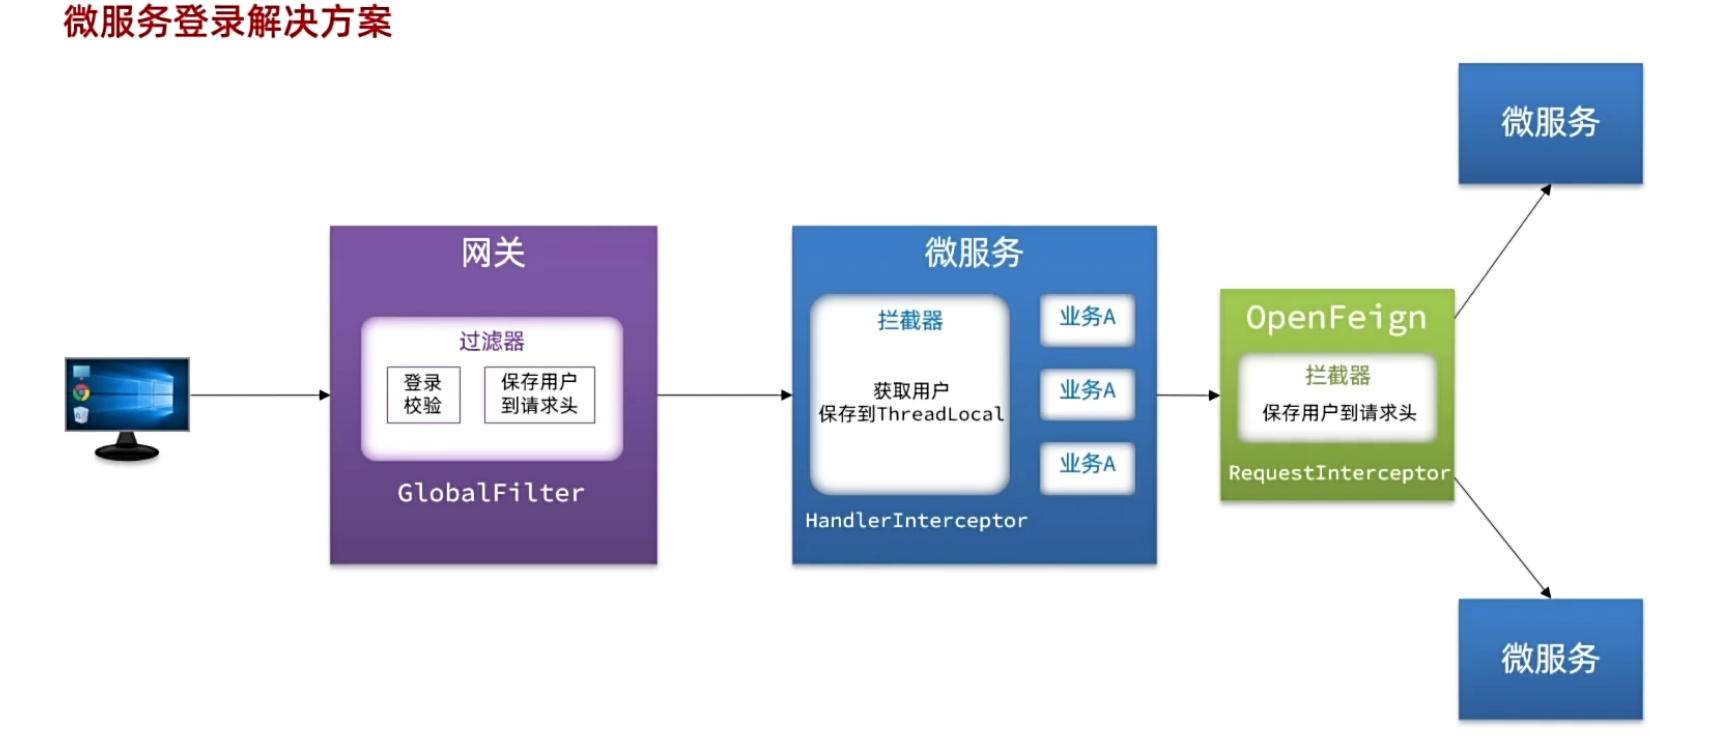
前端发起的请求都会经过网关再到微服务,微服务可以轻松获取登录用户信息。但是,有些业务是比较复杂的,请求到达微服务后还需要调用其它多个微服务,**微服务之间的调用**无法传递用户信息,因为**不在一个上下文**(线程)中!
|
||
|
||
解决思路:**让每一个由OpenFeign发起的请求自动携带登录用户信息**。要借助Feign中提供的一个拦截器接口:`feign.RequestInterceptor`
|
||
|
||
```java
|
||
public class DefaultFeignConfig {
|
||
@Bean
|
||
public RequestInterceptor userInfoRequestInterceptor(){
|
||
return new RequestInterceptor() {
|
||
@Override
|
||
public void apply(RequestTemplate template) {
|
||
// 获取登录用户
|
||
Long userId = UserContext.getUser();
|
||
if(userId == null) {
|
||
// 如果为空则直接跳过
|
||
return;
|
||
}
|
||
// 如果不为空则放入请求头中,传递给下游微服务
|
||
template.header("user-info", userId.toString());
|
||
}
|
||
};
|
||
}
|
||
}
|
||
```
|
||
|
||
同时,需要在服务调用者的启动类上添加:
|
||
|
||
```java
|
||
@EnableFeignClients(
|
||
basePackages = "com.hmall.api.client",
|
||
defaultConfiguration = DefaultFeignConfig.class
|
||
)
|
||
```
|
||
|
||
|
||
|
||
**整体流程图**
|
||
|
||
|
||
|
||
|
||
|
||
## 配置管理
|
||
|
||
微服务共享的配置可以统一交给**Nacos**保存和管理,在Nacos控制台修改配置后,Nacos会将配置变更推送给相关的微服务,并且无需重启即可生效,实现**配置热更新**。
|
||
|
||
### 配置共享
|
||
|
||
**在nacos控制台的配置管理中添加配置文件**
|
||
|
||
- `数据库ip`:通过`${hm.db.host:192.168.150.101}`配置了默认值为`192.168.150.101`,同时允许通过`${hm.db.host}`来覆盖默认值
|
||
|
||

|
||
|
||
**配置读取流程:**
|
||
|
||
<img src="https://pic.bitday.top/i/2025/05/24/s9s6am-0.png" alt="image-20250524170952380" style="zoom:67%;" />
|
||
|
||
微服务整合Nacos配置管理的步骤如下:
|
||
|
||
1)引入依赖:
|
||
|
||
```xml
|
||
<!--nacos配置管理-->
|
||
<dependency>
|
||
<groupId>com.alibaba.cloud</groupId>
|
||
<artifactId>spring-cloud-starter-alibaba-nacos-config</artifactId>
|
||
</dependency>
|
||
<!--读取bootstrap文件-->
|
||
<dependency>
|
||
<groupId>org.springframework.cloud</groupId>
|
||
<artifactId>spring-cloud-starter-bootstrap</artifactId>
|
||
</dependency>
|
||
```
|
||
|
||
2)新建bootstrap.yaml
|
||
|
||
在cart-service中的resources目录新建一个bootstrap.yaml文件:
|
||
|
||
主要给nacos的信息
|
||
|
||
```yml
|
||
spring:
|
||
application:
|
||
name: cart-service # 服务名称
|
||
profiles:
|
||
active: dev
|
||
cloud:
|
||
nacos:
|
||
server-addr: 192.168.150.101 # nacos地址
|
||
config:
|
||
file-extension: yaml # 文件后缀名
|
||
shared-configs: # 共享配置
|
||
- dataId: shared-jdbc.yaml # 共享mybatis配置
|
||
- dataId: shared-log.yaml # 共享日志配置
|
||
- dataId: shared-swagger.yaml # 共享日志配置
|
||
```
|
||
|
||
3)修改application.yaml
|
||
|
||
```yml
|
||
server:
|
||
port: 8082
|
||
feign:
|
||
okhttp:
|
||
enabled: true # 开启OKHttp连接池支持
|
||
hm:
|
||
swagger:
|
||
title: 购物车服务接口文档
|
||
package: com.hmall.cart.controller
|
||
db:
|
||
database: hm-cart
|
||
```
|
||
|
||
|
||
|
||
### 配置热更新
|
||
|
||
有很多的业务相关参数,将来可能会根据实际情况临时调整,如何不重启服务,直接更改配置文件生效呢?
|
||
|
||
示例:购物车中的商品上限数量需动态调整。
|
||
|
||
1)在nacos中添加配置
|
||
|
||
在nacos中添加一个配置文件,将购物车的上限数量添加到配置中:
|
||
|
||
文件的dataId格式:
|
||
|
||
```text
|
||
[服务名]-[spring.active.profile].[后缀名]
|
||
```
|
||
|
||
文件名称由三部分组成:
|
||
|
||
- **`服务名`**:我们是购物车服务,所以是`cart-service`
|
||
- **`spring.active.profile`**:就是spring boot中的`spring.active.profile`,可以省略,则所有profile共享该配置(不管local还是dev还是prod)
|
||
- **`后缀名`**:例如yaml
|
||
|
||
示例:`cart-service.yaml`
|
||
|
||
```YAML
|
||
hm:
|
||
cart:
|
||
maxAmount: 1 # 购物车商品数量上限
|
||
```
|
||
|
||
|
||
|
||
2)在微服务中配置
|
||
|
||
```java
|
||
@Data
|
||
@Component
|
||
@ConfigurationProperties(prefix = "hm.cart")
|
||
public class CartProperties {
|
||
private Integer maxAmount;
|
||
}
|
||
```
|
||
|
||
|
||
|
||
下次,只需改nacos中的配置,即可实现热更新。
|